Showing posts with label 3d. Show all posts

Wednesday, February 7, 2018

Truly, Madly, Deeply - FINALLY!


Grab some snacks and sit a spell, this is going to be a long post. You've been warned! 

When I first got a sneak peek of the Heart-Shaped Lantern that would be released in the new Truly, Madly, Deeply collection from Bird's SVGs, I was dazzled. I couldn't wait to build one of my own! 


Bird very cleverly created a separate cut out for the central vellum heart so that it could be embossed in an embossing folder - so cool!  Around the same time, I was watching a Jennifer McGuire video about alcohol ink lifting where she made some beautiful patterns on vellum. I was intrigued to try it and figured why not give it a go on my lantern.

So I inked up a piece of scrap vellum with some red and purple alcohol ink, grabbed a lacy Tim Holtz stencil and tested it out. Fun technique! 


Next I inked up my vellum heart and did the same thing. Unfortunately I forgot to take a picture of the heart after the ink was lifted, but you can see it in the finished lantern.


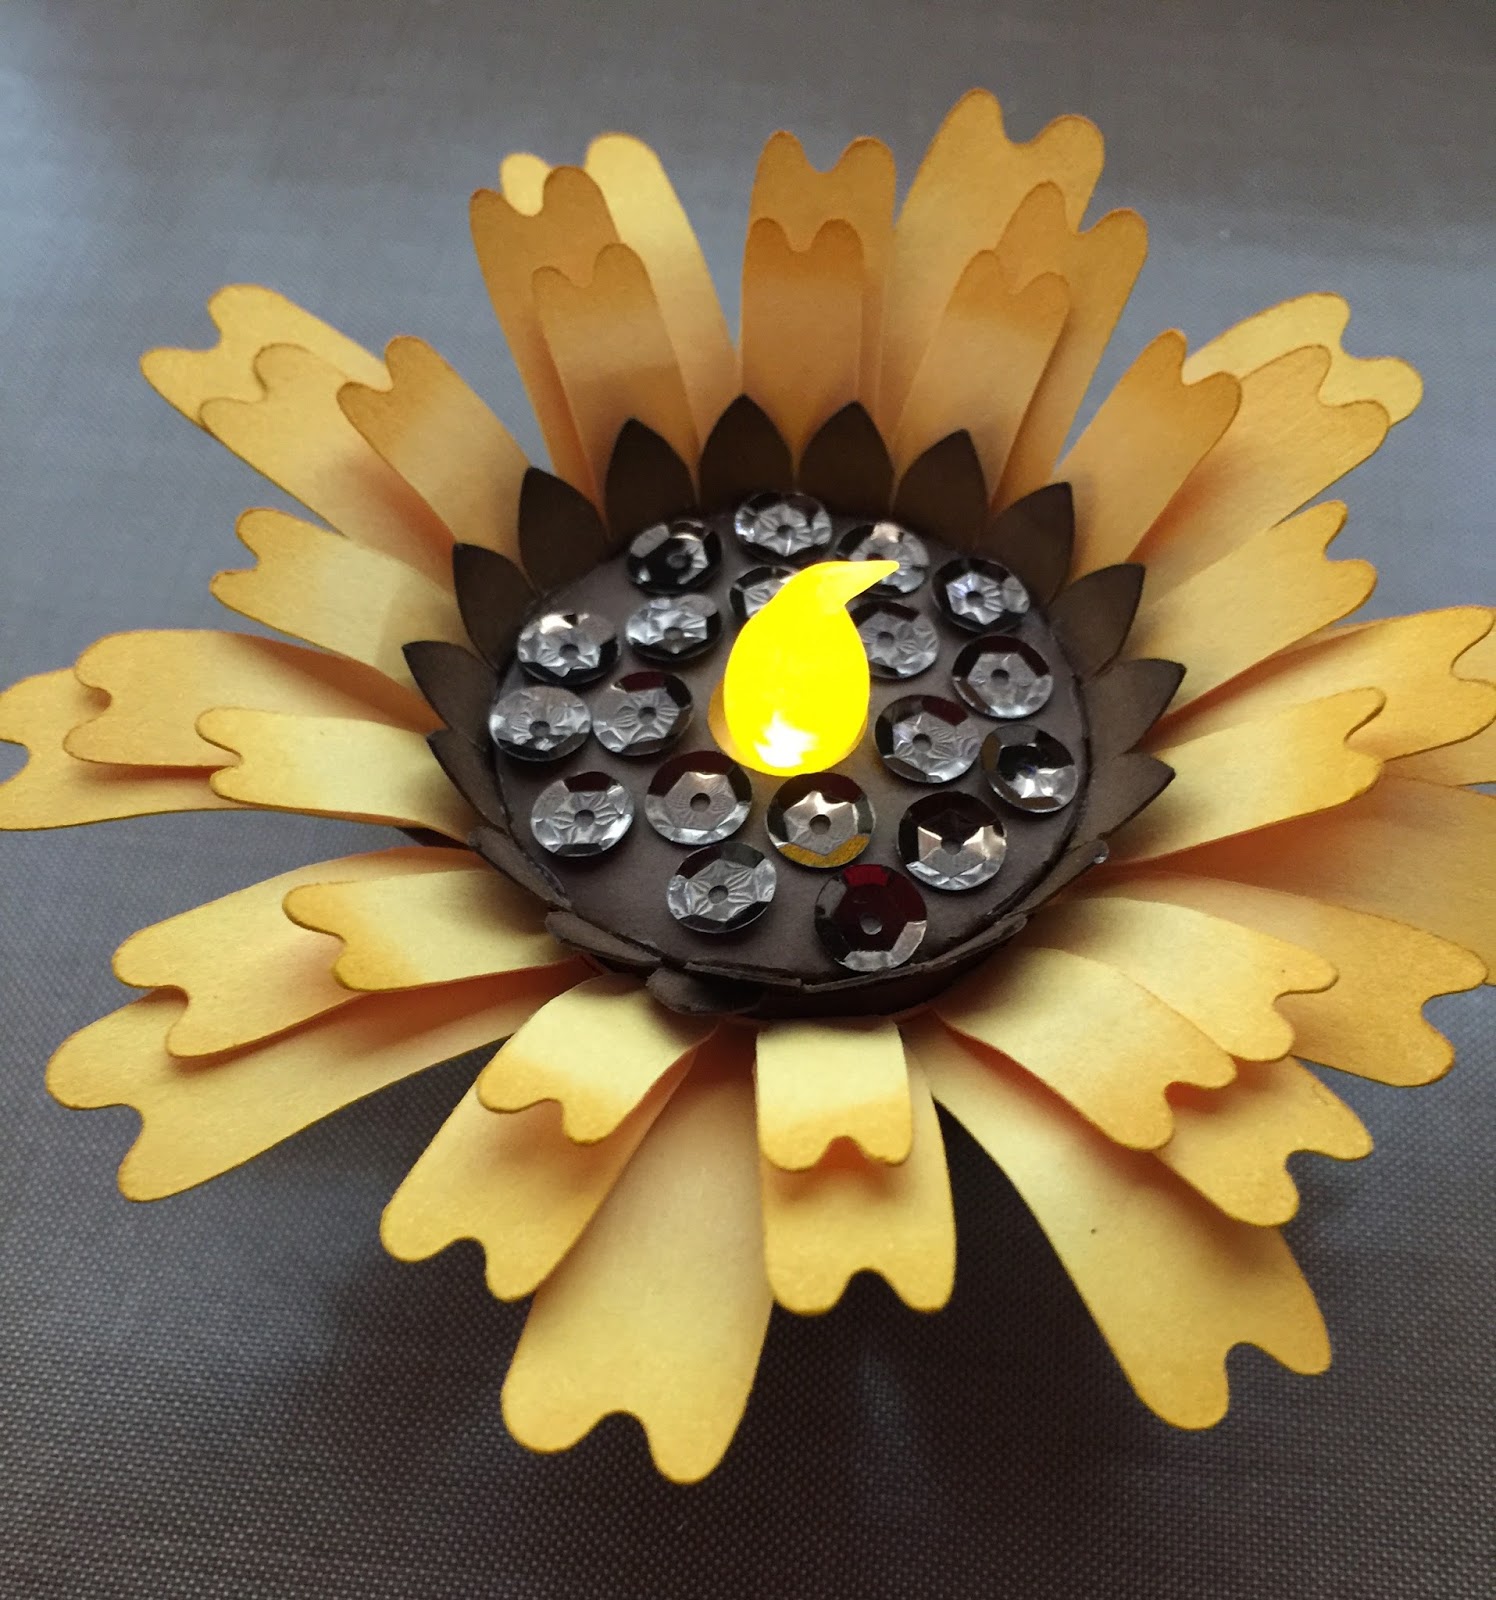
For the body of the lantern, I kept thinking about what colors I would use to really make it something that would fit into my home decor. I have some black wrought iron furniture with antique gold accents and I thought that might look really great.

I embossed the lid panels with a similar lacy Tim Holtz texture fade (embossing folder) and then rubbed over the embossing with some antique gold wax. I love how the embossing is highlighted this way.


I built the rest of my lantern and also rubbed some of the gold wax around the panels and edges and called it done.  


I liked it, but I just felt like it needed something else. The gold wax didn't come out as well on the body of the lantern as I would have liked. I put it on display and have been lighting it up every night for a week while I pondered my next step. 

Today, inspiration finally struck. I re-cut the offset panels for the outside of the lantern, but this time I used some Tim Holtz metallic kraft paper. I embossed the pieces, painted them with black paint and then wiped some away to get a worn brass look. I glued them to the lantern and now I'm so very happy with it!


Here's a view from the side:


You might wonder how I embossed the large front panel as it doesn't fit through most embossing machines. It's a trick I read about years ago and this was the first time I actually tried it. Rather than putting the embossing folder though a machine, you can roll over it with a rolling pin, or in my case, a brayer. 

The impression isn't as deep as if you ran it through a machine, but it's good enough!  I put a tan embossing mat down on my craft table and then the embossing folder with the paper inside of it and then went to town rolling over it with a LOT of pressure.  Persistence paid off though, and I think the embossing really makes this project come to life.


I added a color-changing electronic tea light inside and it looks magical as it cycles through every color of the rainbow. Watching it glow reminded me of a very unique place I visited as a teenager. 

I grew up less than an hour from Yale University and one of our high school teachers took us on a class trip to the Beinecke Rare Book and Manuscript Library. From the outside, it's an unusual looking building (photo from Google images), but nothing really spectacular. But notice all those square-ish panels...


...they are made of thin marble and when on the inside of the library on a sunny day, the whole place absolutely glows. It's really beautiful and something neat to see if you ever get the chance. You'd never imagine that looking at it from the outside. (Photo from Google images)


So now that I've taken you on a trip down memory lane, you can see why the lighted lantern reminded me of that beautiful glowing marble.


Still with me?  I'm almost done rambling on, I promise!  

If you've made this lantern, what did you do with all of those leftover hearts from your cutting mat? I couldn't bring myself to throw them away! 


Using some painter's tape, I carefully transferred the rows of hearts and glued them to a piece of 4" x 5.25" cardstock. Once they were all glued down, I ran the whole panel through my Cuttlebug with an embossing folder. Then I glued it onto a gold glitter pre-made A2 card.  Now I've got an extra card for the next time I need one. All I'll need to do is add a sentiment to the front and it'll be ready to go. 


I really appreciate the fact that you've stuck with me this far. I hope you didn't run out of snacks! Thanks for stopping by and I'd truly love to hear what you think of my lantern if you'd like to leave a comment below.

Friday, January 26, 2018

Batty for you!


I used a free Halloween file from Birds's SVGs to make the front of this card - the bat background can be found here. The svg is a square originally, but I stretched it to fit the front of my card and it really didn't distort the images. The sentiment is one I created in Cricut Design Space using one of my favorite free fonts, Milkshake, from Dafont.com. I went with eye-popping pink and purple for a fun Valentine's color scheme.

Speaking of eye-popping, you know that heart-eye emoji that is so popular on social media to express our love of whatever we're looking at? I totally used that idea when creating the inside of the card. 


I never got around to making the awesome Bat Pop-Out card from Bird's SVGs Creak 'n' Shriek collection last Halloween and was just looking for a reason. I'm also a fan of silly puns, so I thought this was a good one to use for Valentine's Day.  

I used some clear Wink of Stella on the wing 'ribs' to add a little contrast and shine. The teeth are cut from white glitter cardstock and really sparkle. I even painted Ms. Batty's toenails bright red with some Nuvo Drops so she's well manicured for the holiday.  


I love the surprise of opening a Valentine's Day card to find a silly bat making heart eyes at you!


Other sentiments that might be fun with this one include:

- Love you the moon and bat
- You drive me batty
- I want to have your rabies!
- I bat you don't know...
- Love bites

And while I was making the bat, I was thinking about the Shark Pop-Out card from the equally fun Jawsome collection, also from Bird's SVGs.  


You could add heart eyes to him too or maybe some sparkly red lipstick to make it a she-shark! Here's a few sentiment ideas for that too:

- You're a fin-tastic Valentine
- Love bites
- You're so cute I could just gobble you up


Thanks for stopping by to check out my batty Valentine's card. I'd love to hear what you think!

Saturday, October 7, 2017

Creepy Coffin Luminary


I just loving making Halloween crafts, and I was super excited to see this creepy coffin luminary released by Bird's SVGs. It's from the new Creak 'n' Shriek collection

Creak 'n' Shriek Collection from Bird's SVGs
If you've read my blog before, you probably know how I adore things that light up, so naturally this was the first project in the collection that I just had to create. 

Not only does this project go together very easily, Bird's assembly tutorial has several helpful tips along the way, including one suggestion for avoiding wrinkly vellum on such a large piece.  Honestly, I love listening to both Bird's accent and her handy tips and therefore watch all of her videos even if I have a pretty good idea how things go together!

I followed Bird's suggestion and used some antique gold Rub and Buff wax to highlight my pieces and it really has a fantastic effect.  You can see it much better in this picture. I love the worn, vintage look this added to the piece.


On the base of the luminary, I added some dried Spanish moss to make it look like this crypt was a bit overgrown. I used some antique gold brads to the RIP plaque.


Last but not least I decided that a black rose with some gold wax highlights was the perfect finishing touch.


I've really been enjoying looking at my creepy coffin luminary every night.  It's just so cool!


Be sure to check out the full collection from Bird's SVGs - there are several amazing projects for Halloween.  I think the pop-up bat card might be next on my list.

Thanks for stopping by! I'd love to hear what you think. 

Monday, March 6, 2017

I'm so EGG-cited about these FAUXberge eggs!


I was already pretty excited about the new Eggstravagance kit from Bird's SVGs when I found out that the largest white and gold egg shown below is a luminary. For someone like me who particularly loves projects that glitter and glow, this is majorly EGG-citing!  The blingy possibilities for these Faberge-inspired beauties just makes my soul happy. 


The best part is that this kit was just released yesterday and is ON SALE for a limited time!

I used some metallic pink cardstock for my egg, although I really love Bird's egg all in gold. It's so luxurious looking! I definitely need to stock up on some more metallics and bling for future projects.  I planned to add some more pearls around the smaller rings of the pedestal, but didn't have as many as I thought. Oh well, just one more excuse to shop for craft supplies!


I had fun putting this together and even more fun lighting it up when I was done. I used a color changing electronic tea light under the shade and it is so pretty as it transitions through a rainbow of colors.  


Incidentally, if you're looking for the perfect bag in which to gift one of these beautiful eggs, you should definitely check out the Easter Egg gift bag from Bird's Easter Egg Hunt kit shown below. The bag could be made with matching metallic details and gems added on the outside.  What an elegant presentation that would make!


Thanks so much for stopping by! I'd love to hear what you think. 

Thursday, August 11, 2016

Football Marquee Sign


I had so much fun building this football marquee sign from the SVG Cuts Game Day Marquee Signs kit

I used some pigskin paper that I found at Hobby Lobby for the football, and therefore did not use the extra football panels for embossing since this paper is already textured.  


Since this is for personal use only, I added a "Steelers" cutout to the top panel. One thing that I found out after the fact is that NFL footballs don't have the white stripes on the ends. Unfortunately they were already glued down when I was informed of this, so my project might look a little mismatched to die-hard football fans, but I'm good with it and so is the recipient. And now I know for next time! Am I the only one who didn't know this?

I had some of the smoke-colored, faceted Heidi Swapp bulb caps in my stash, so I used those as they blend in really nicely with the black background paper when the lights are off. 


And when the lights are on, they're a little bit of a softer light and I love the effect from the facets.


I have a feeling I'll be making several more of these for Christmas for the sports fans in the family!  I got this one done just in time for tomorrow night's first pre-season game for the Steelers. I hope it brings them luck.            

Thanks for stopping by!

Sunday, July 31, 2016

Got Milk?


When I first saw the Bird's SVGs 'coming soon' message regarding the Nature's Bounty kit, I was truly excited to see a milk can in the collection. Over the past year or so, I've been trying to combine my love of both paper crafting and genealogy into some of my projects.  

My great-grandparents lived on a farm in Pennsylvania, and my great-grandfather Harry was a dairy manager. Unfortunately, my great-grandmother passed away at a very young age when my grandmother was barely four years old. One of the few pictures I have of my great-grandmother is this one with my grandmother as an infant, and a few milk cans in the background. 


Add in Harry's career as a dairy man (pictured on the right in the photo below) and you can see why I thought this project would be so much fun to incorporate into my family history projects/home decor.  Because this milk churn is also a box, I'm thinking it might be fun to put together a mini album with some of these photos which I can store inside the can.  That'll be a project for another day though.


Okay, family history lesson over!  I did an online search to get a feel for what vintage milk cans looked like and notice that many of them had raised/embossed lettering on the sides with the name of the dairy they came from.  I love that Harry's name rhymes with 'dairy,' so I decided to make that the name for the side of the can...Harry's Dairy!  The next trick was figuring out how to get the look of raised metal letters.  

I decided that I could cut the letters out of the same metallic paper I was using for the can and then just glue them on. I used Tim Holtz Alphanumeric Thinlets to cut the letters.


There are also a lot of photos of very rusted and distressed old milk cans, so before I added the letters, I scratched up and sanded the metallic cardstock panel pieces and then inked them all with some Distress ink in Walnut Stain.  


Once I was done making an inky mess of myself, I adhered the panels to the can and fell in love with the final results. I may have gotten a little bit carried away with the distressing in a few spots, but overall, I just love how this turned out.  


Thanks to Bird's wonderful design, I was able to put it all together in just an hour or two which included everything from the time I fired up my Cricut until I was taking pictures of the finished project.   

There are a few days left for you to get the Nature's Bounty kit from Bird's SVGs while it is still on special - a great deal with so many fun projects. 

You can find it here:  Nature's Bounty SVG Collection


And here's one more look at my finished project:


Thanks for stopping by!  I'd love to hear what you think of my vintage milk can in a comment below.  

Thursday, July 28, 2016

Exciting news!

I'm so excited to announce that I have been selected to be a design team member for Bird's SVGs! You can read more about it here.

I have been following Bird's Cards for years and have always loved her designs. In addition, I have appreciated her generosity in designing hundreds of free svg files for her friends and followers. When Bird opened her SVG shop last Fall, I got straight to shopping!

If you've never visited Bird's store, you really should check it out. Look at the lovely Nature's Bounty kit which Bird released last night (shown below). As if paper crafting isn't enough, one of my other hobbies is genealogy, and my great-grandfather was a dairy man. I'm really looking forward to making the milk can very soon and personalizing it to include this family information.  

Nature's Bounty

The very first kit Bird released in her new store was the free Birdhouse Collection which includes several cards, a tag and a 3D birdhouse! I think it's so cute and plan to make the 3D birdhouse with a Christmas theme this year. 

Birdhouse Collection

Thanks for stopping by to share my happy news and please follow my blog or stop by often to see what new projects I'll be posting.  And special thanks to Bird for inviting me to join her design team - this made my whole month!

Tuesday, June 28, 2016

Rocket Lantern

...and the rocket's red glare....
  

Okay, well maybe more than just red glare! I only made one rocket (so far), but I was having a good time taking pictures of it every time the tealight changed color, so figured I'd just share all of the colorful pics. 

Here's a closer look at my Rocket Lantern from Dreaming Tree's Stars and Stripes Forever bundle. It's just one of three illuminating projects just in time for the 4th of July. 


I didn't really do anything to change this one very much from the original by Dreaming Tree...why mess with perfection?  I did use silver glitter paper for the nose cone and base, but other than that, I kept it pretty simple.  

This could be so cute for New Year's Eve too, don't you think?  Maybe done in black, silver and gold instead?  The sky's the limit (pun intended).  

Thanks for stopping by! 

Thursday, June 23, 2016

Sunflower-ish Tealight


Just a really quick post to show you what I did with the free Gerbera Daisy Tea Light from Dreaming Tree.  

For some reason I was thinking of how cool these would look in some fall colors, and decided to make this into a sunflower of sorts.  Or maybe a black-eyed susan?  Either way, the sequins in the center reflect the tealight flame a bit and make this extra sparkly which always makes me happy. I think a glittered center would be cool too.  

Thanks for stopping by!

Tuesday, May 31, 2016

Get Well Mailbox Bouquet


Here's just a quick post to show the Mailbox Bouquet card from Dreaming Tree that I made for a friend who was in the hospital. She loves bright colors, particularly pink and purple, so that's what I primarily used for her card.

I love how the colors, particularly the green, pop against the black mailbox background.  She's also a fan of black and red, so the black mailbox base with the glittery red flag were just right for this project.


For the mailbox side panels, I stamped a pretty floral pattern in Versamark ink and dusted it with gold Perfect Pearls powder.  What an easy way to create customized shimmery cardstock in whatever pattern or color you choose.

Thanks for stopping by!


This post may contain affiliate links. If you purchase a product using the link I may receive a commission.  I only participate in affiliate programs for products or services that I personally use and recommend.