Showing posts with label tim holtz. Show all posts

Saturday, March 9, 2019

Here Comes Peter Cottontail


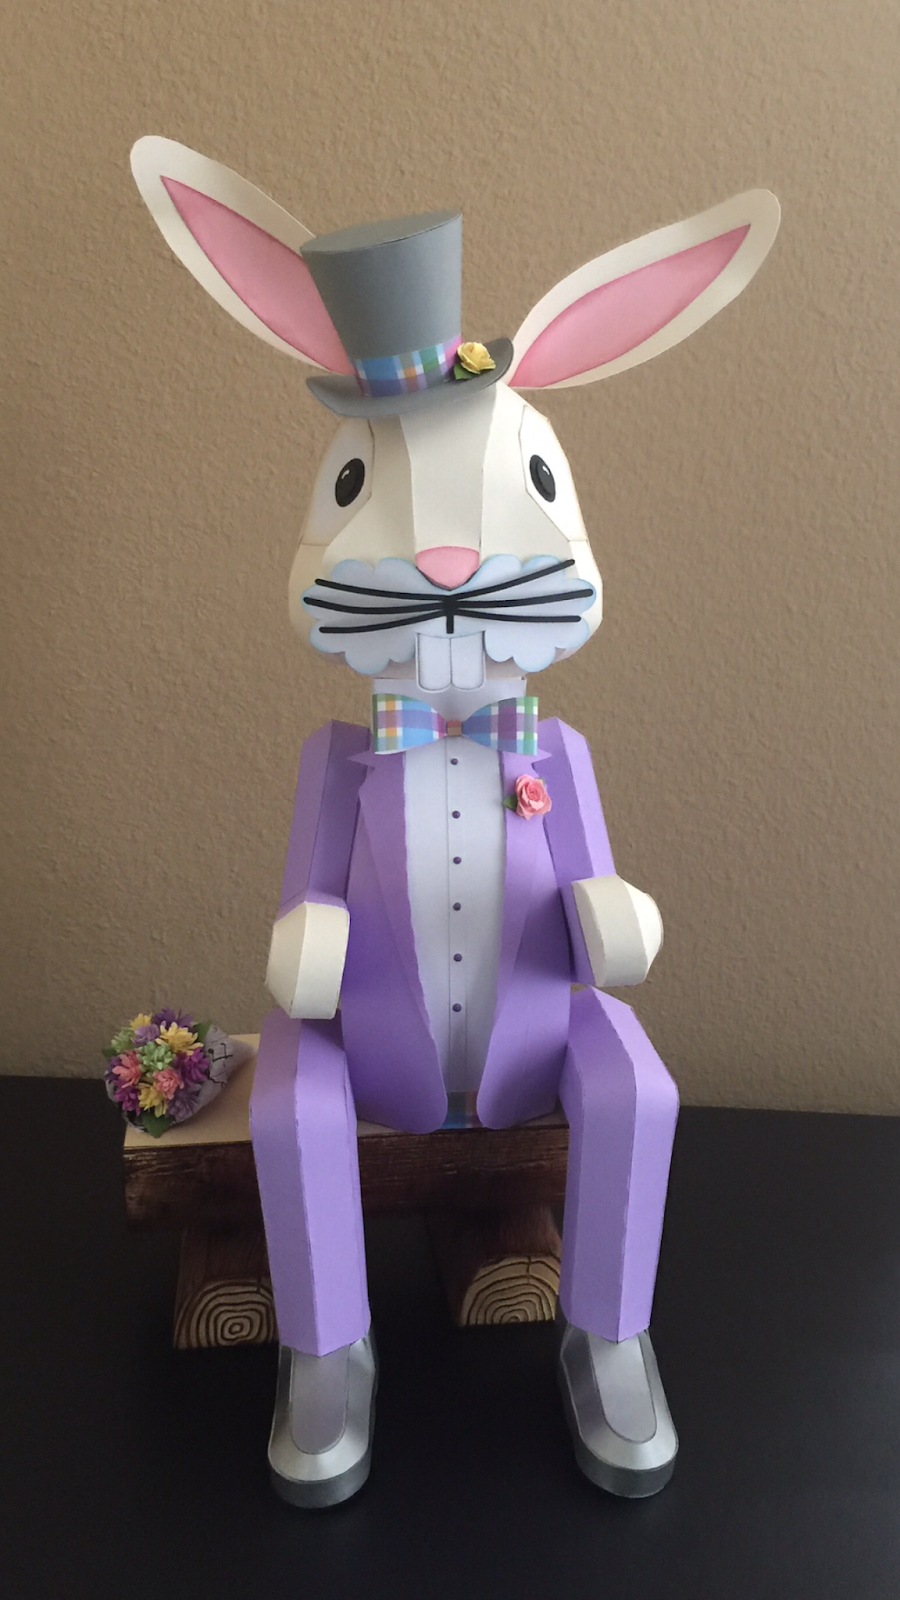
Hi there!  Just a quick post to show the fun Easter project I recently made.  This amazing SVG file is called Waiting For Easter. I purchased it from the Creatieve Papier Uitspattingen website. It includes the bunny with top hat as well as the log bench. All of the SVG pieces were cut out with my Cricut Maker.

I decided to dress Mr. Cottontail in some lovely pastel colors for Spring. I didn't think to take a lot of pictures while creating, but I'll give you what details I can.

The roses on his hat and lapel are from the Tiny Tattered Floral die by Tim Holtz.  I also used this die set to create the flowers for the bouquet on the bench. 

I used some pastel paper scraps to cut out the flowers, rolled them up and glued them to the top half of a 1-inch Styrofoam ball. Then I created a small paper cone and tucked some Tim Holtz collage paper around the edge to look like the pretty papers that often accompany a fresh flower bouquet.  I simply hot glued the flower ball into the cone to complete the bouquet.  I like to think that Mr. Cottontail is waiting for Ms. Bunny to arrive so he can present her with these lovely flowers on their way to Easter Brunch!


I wanted to give the log bench a realistic appearance, so I cut the outer panel pieces from Tim Holtz Distress Mixed Media Heavystock paper. I embossed the panels with the Tim Holtz Lumber 3D embossing folder to get the realistic log texture and then I colored the panels with Tim Holtz Distress Stain in Vintage Photo and Bundled Sage. 


After the stain dried, I used a blending tool to lightly ink over the top grain with some Vintage Photo Distress Ink. Obviously I have a slight obsession with all things Tim Holtz! I applied the panels to the assembled bench after slightly curving the pieces so they would glue down nicely.


I used another Tim Holtz embossing folder called Tree Rings to emboss the end pieces of the logs and again lightly inked over them with Vintage Photo Distress Ink.  I used the exact same methods for the larger log and assembled my bench with some hot glue.


I'm really so thrilled with how the bench turned out!  

For the final detail, I added a white pom pom tail to the back of Mr. Cottontail with some hot glue. It seemed like the perfect finishing touch. 


With Easter being so late this year, I find myself happy to have completed this project early so that I can enjoy looking at it for a while.  I really hopped right on it this year!  Pun intended.

Here's one last look at the whole project:


Thanks for stopping by! 


Monday, May 14, 2018

Secret Garden


When I learned that a family member was going to be celebrating her 75th birthday, I set out to build her a special card to commemorate the occasion.  The card turned into an explosion box featuring her love of gardening, tea and all things vintage!  Her garden is so beautiful that it was featured in a magazine years ago.

I used a variety of svg files, dies and punches to create my project.  I started by using the Easter Explosion Box from Dreaming Tree as the base.  I only used the main body and lid along with the panels to go on them.  I cut the panels from glittery hydrangea paper from K & Company which I've had in my stash for many, many years. The garden is bordered by huge hydrangea bushes and so I wanted to include some in the project.  The tag is cut from a Tim Holtz die and the butterfly is from a layered punch by Martha Stewart.  I embellished the butterfly with some Liquid Pearls by Ranger.


I also wanted to include a dramatic flower on top of the box instead of using a bow.  I've been wanting to make the peony from Dreaming Tree's Love You Mom collection, so I Googled it to make sure that blue peonies actually exist and they do - they're quite beautiful!


Next came the inside where I went with a completely different color scheme than on the outside.  Here's a bird's eye view with the lid removed:


The centerpiece for inside the box is this rose-filled teacup; the svg files for the cup, saucer and spoon are from the SVGCuts Tea For You & Me kit.


I cut the small rolled roses out of three different shades of pink cardstock using a Sizzix die. I added a floral foam block inside the teacup, glued some Spanish moss over top of it and then hot glued the roses on top of that. I added the tea tag which I created from a scrap of Tim Holtz paper and some numeric rubber stamps.


The doily underneath the tea cup is a Tim Holtz die. I added an extra rose and a little greenery leftover from another project, also from a Tim die.  It's hard to see in the picture, but I wrapped a thin gold washi tape around the base of the tea cup to match the gold handle and gold foil in the paper print on the outside of the cup. I embossed the very end of the spoon and added a little pearl to embellish.


I originally wanted to make some offset flaps on the corners so that it looked sort of like a lacy napkin underneath the tea cup. I converted these beautiful lace banner pennants from Bird's SVGs Tea Party collection by adding a tab to the top of the banner for gluing into the box.  Unfortunately I didn't take the width of the saucer into consideration when designing the project and when I tried to add the flaps at the corners, the wouldn't fold up properly.  I didn't want to waste them, so I just used them in alignment with the outer flaps, although I would have made them larger if that was my original plan.


I embellished each flap with a pearl and a piece of Tim Holtz ephemera that matched the project.


For the outer flaps, I used a pink and purple, lightly glittered piece of K & Company paper for the panels and edged each panel with a strip of lace cut with a Tim Holtz die.  I added some white liquid pearls along the edges as well.


On each outer panel I added more ephemera, mostly from Tim Holtz, as well as some Chit Chat stickers, also from Tim.  


On the last panel, I cut out a little envelope and tucked in a tiny card that I stamped with a Happy Birthday sentiment, added a ribbon pull tag, signed the back and added a little velcro dot to close.


Oh, and I forgot to mention the butterflies on the inside!  They are all from Martha Stewart punches. The larger ones were glued to some acetate strips which I glued to the base, so when the box explodes open, the butterflies flutter around a bit.  I cut the base layer of the butterfly with leftover patterned paper and the top layer was cut using vellum.  I added some liquid pearls to these too.  


I packed this up and put it in the mail last week. The recipient absolutely loved it! I'm so glad because it was quite a bit of work, although I enjoyed every minute of planning and executing it so it would turn out how I envisioned.  

Every project leaves me with a list of things I'd change, do better or remember to include next time. I think that's part of what makes it fun and helps us grow artistically.  I really enjoyed being able to mesh many different svgs, dies and other supplies into one cohesive project.

Well that was a long post, so thanks for hanging in there if you've made it this far. I appreciate you taking the time. Thanks so much for stopping by!  Until next time...

Wednesday, February 7, 2018

Truly, Madly, Deeply - FINALLY!


Grab some snacks and sit a spell, this is going to be a long post. You've been warned! 

When I first got a sneak peek of the Heart-Shaped Lantern that would be released in the new Truly, Madly, Deeply collection from Bird's SVGs, I was dazzled. I couldn't wait to build one of my own! 


Bird very cleverly created a separate cut out for the central vellum heart so that it could be embossed in an embossing folder - so cool!  Around the same time, I was watching a Jennifer McGuire video about alcohol ink lifting where she made some beautiful patterns on vellum. I was intrigued to try it and figured why not give it a go on my lantern.

So I inked up a piece of scrap vellum with some red and purple alcohol ink, grabbed a lacy Tim Holtz stencil and tested it out. Fun technique! 


Next I inked up my vellum heart and did the same thing. Unfortunately I forgot to take a picture of the heart after the ink was lifted, but you can see it in the finished lantern.


For the body of the lantern, I kept thinking about what colors I would use to really make it something that would fit into my home decor. I have some black wrought iron furniture with antique gold accents and I thought that might look really great.

I embossed the lid panels with a similar lacy Tim Holtz texture fade (embossing folder) and then rubbed over the embossing with some antique gold wax. I love how the embossing is highlighted this way.


I built the rest of my lantern and also rubbed some of the gold wax around the panels and edges and called it done.  


I liked it, but I just felt like it needed something else. The gold wax didn't come out as well on the body of the lantern as I would have liked. I put it on display and have been lighting it up every night for a week while I pondered my next step. 

Today, inspiration finally struck. I re-cut the offset panels for the outside of the lantern, but this time I used some Tim Holtz metallic kraft paper. I embossed the pieces, painted them with black paint and then wiped some away to get a worn brass look. I glued them to the lantern and now I'm so very happy with it!


Here's a view from the side:


You might wonder how I embossed the large front panel as it doesn't fit through most embossing machines. It's a trick I read about years ago and this was the first time I actually tried it. Rather than putting the embossing folder though a machine, you can roll over it with a rolling pin, or in my case, a brayer. 

The impression isn't as deep as if you ran it through a machine, but it's good enough!  I put a tan embossing mat down on my craft table and then the embossing folder with the paper inside of it and then went to town rolling over it with a LOT of pressure.  Persistence paid off though, and I think the embossing really makes this project come to life.


I added a color-changing electronic tea light inside and it looks magical as it cycles through every color of the rainbow. Watching it glow reminded me of a very unique place I visited as a teenager. 

I grew up less than an hour from Yale University and one of our high school teachers took us on a class trip to the Beinecke Rare Book and Manuscript Library. From the outside, it's an unusual looking building (photo from Google images), but nothing really spectacular. But notice all those square-ish panels...


...they are made of thin marble and when on the inside of the library on a sunny day, the whole place absolutely glows. It's really beautiful and something neat to see if you ever get the chance. You'd never imagine that looking at it from the outside. (Photo from Google images)


So now that I've taken you on a trip down memory lane, you can see why the lighted lantern reminded me of that beautiful glowing marble.


Still with me?  I'm almost done rambling on, I promise!  

If you've made this lantern, what did you do with all of those leftover hearts from your cutting mat? I couldn't bring myself to throw them away! 


Using some painter's tape, I carefully transferred the rows of hearts and glued them to a piece of 4" x 5.25" cardstock. Once they were all glued down, I ran the whole panel through my Cuttlebug with an embossing folder. Then I glued it onto a gold glitter pre-made A2 card.  Now I've got an extra card for the next time I need one. All I'll need to do is add a sentiment to the front and it'll be ready to go. 


I really appreciate the fact that you've stuck with me this far. I hope you didn't run out of snacks! Thanks for stopping by and I'd truly love to hear what you think of my lantern if you'd like to leave a comment below.

Thursday, December 7, 2017

Mini Winter Wonderland


This is a very quick post to show a project I made yesterday. It was 100% inspired by Richele Christensen's Winter Wonderland project which can be found here.

I still want to make the full-sized project at some point, but for now I've made a smaller, card-sized version using the same Tim Holtz Sizzix dies and some Chibitronics lights.  In my haste to create, I didn't think to take a picture of the circuit I set up, but it was a pretty easy one.  I used 3 white lights under some vellum to give it a bit of glow.  

And now I can't stop playing with the on/off  'switch' as it's so much fun to see this light up over and over again. I'm like a kid with a new toy!


I love this so much I'm not sure if I'll be giving it away or keeping it for myself. It's like my own personal version of a fidget spinner.  Lights on, lights off, lights on, lights off!  


One more picture from the side so you can see the pretty glitter that doesn't show up in the other shots.  

Thanks for stopping by!

Sunday, May 7, 2017

It's Tiki Time!


Lately I've been wanting to make some bright, colorful and beachy summer craft projects. I've had this one in my head for a while. This tiki lantern is inspired from a card in the Club Tropicana kit from Bird's SVGs.

Here's a picture of the kit and the specific card that inspired this project:


These projects had me imagining a fabulous party on a tropical beach somewhere. So of course the party needs tiki torches for after the sun goes down!   

The four-sided lantern 'shade' sits on a base that I adapted from the Bird Cage Luminary base in the Love Birds kit, also from Bird's SVGs.  Instead of using two short and two long base pieces, I just cut out four of the short base pieces to form a square shape. The bottom panel square is 5" and the top panel square is 4", but you could obviously resize this to any size you want. 

One thing I learned through trial and error was to remember the height of the base 'step' that your lantern shade will be sitting on.  I made mine only to discover that when I slipped the shade on, my little tiki guy's toes weren't getting any light shining through because of the height of the base.  I remedied this problem with some bamboo kitchen skewers!

I cut the skewers to fit the width of the base and glue two on each side as risers for the shade to sit on. Ideally I could have redesigned the shade to include more space at the bottom below his feet, but I actually really like the look of the bamboo for this type of project, so I'll just chalk it up to a happy accident.


I embellished with colorful flowers and foliage from Tim Holtz's Tropical thinlet set. And of course I added a little glitter to the hibiscus flower stamen. I do so love glitter and glow!!

I only added the palm 'crown' to the front panel of the lantern as you won't see the other sides where I'll be displaying it, but you could certainly have a ball adding all kinds of embellishments to this little guy. 


I'm so pleased with how this project turned out. The flickering tea light inside really makes this look like it could be a torch. I think these would be so much fun as centerpieces for a luau-themed party!


Anybody ready for a tropical drink yet?  

Thanks for stopping by. As always, I'd love to hear what you think, so feel free to leave a comment below.  

Saturday, April 22, 2017

Shadowbox Collage


I've had so many ideas in my head for what I could do with the Picture Perfect kit from Bird's SVGs.

The kit includes several different sizes and shapes of shadowbox frames as well as a seashore version which can be lit from behind to make a beautiful home decor piece.  Here are a few photos from the kit - beautiful, right?


What I love about this kit is the versatility.  If you spend anytime on Pinterest or other crafty websites, you're sure to see tons of ideas for amazing shadowbox projects.  Shadowboxes are used to highlight everything from rolled flower projects to mixed media collage art as well as gallery walls and special family memories.

The ability to customize the frame to the size you need and to be able to make it exactly when you need it makes this kit a super star in my book.

Last year I made this milk can project, and mentioned at the time that I might make a photo album to
go inside of it.
 
I never did get around to the photo album, but decided to a do a little collage to highlight one of the photos instead.  Using the Square Shadowbox Flower Frame, I cut out pieces in black and metallic cardstock.

For the frame layer, I distressed the metallic cardstock like I did in the milk can project by sanding and scratching it, and then inking the worn spots with Distress ink in Walnut Stain.  For the inside backing piece, I embossed it with a mesh embossing folder, sanded it down a little bit and added some Walnut Stain on there too.


After that I had some fun picking out embellishments to add to the front of the frame. I'm really a beginner in the world of mixed media and collage art and this part is always a challenge. I'm never sure if I should add more or quit while I'm ahead.  Because of this, I did not add the acetate layer to close up the box. I might just need to add some other items inside that I haven't thought of yet!


The sides didn't really need it, but I had this cool wide tissue tape from Tim Holtz that went with the color scheme and overall feel of the project, so I went around the edges with it. I really love how it came out.

The shadowbox itself is so easy to put together, you could make an entire gallery wall for yourself in an afternoon. I see so many possibilities and uses for these frames in addition to creating them with the flowers and embellishments included in the bundle. I have a feeling I'm going to be cranking these out on my Cricut for years to come!


I'd love to hear what you think in the comments below. Thanks so much for stopping by!