Showing posts with label Halloween. Show all posts

Thursday, August 2, 2018

Halloween Countdown Calendar


Let me start by saying that this was a very difficult project to photograph - it's just shy of two feet tall! When I put all of the lights on inside of it, it gets very bright in here too. I've tried to take some pictures of each section to show you a little of what I did, but it's definitely not a full blown tutorial. 

This Halloween Countdown Calendar was my entry into Dreaming Tree's Summer Challenge. If you follow the link, you can see lots of amazing examples of beautiful 3-D papercrafting.  The challenge was to combine files from two or more Dreaming Tree projects to make a unique, custom project.

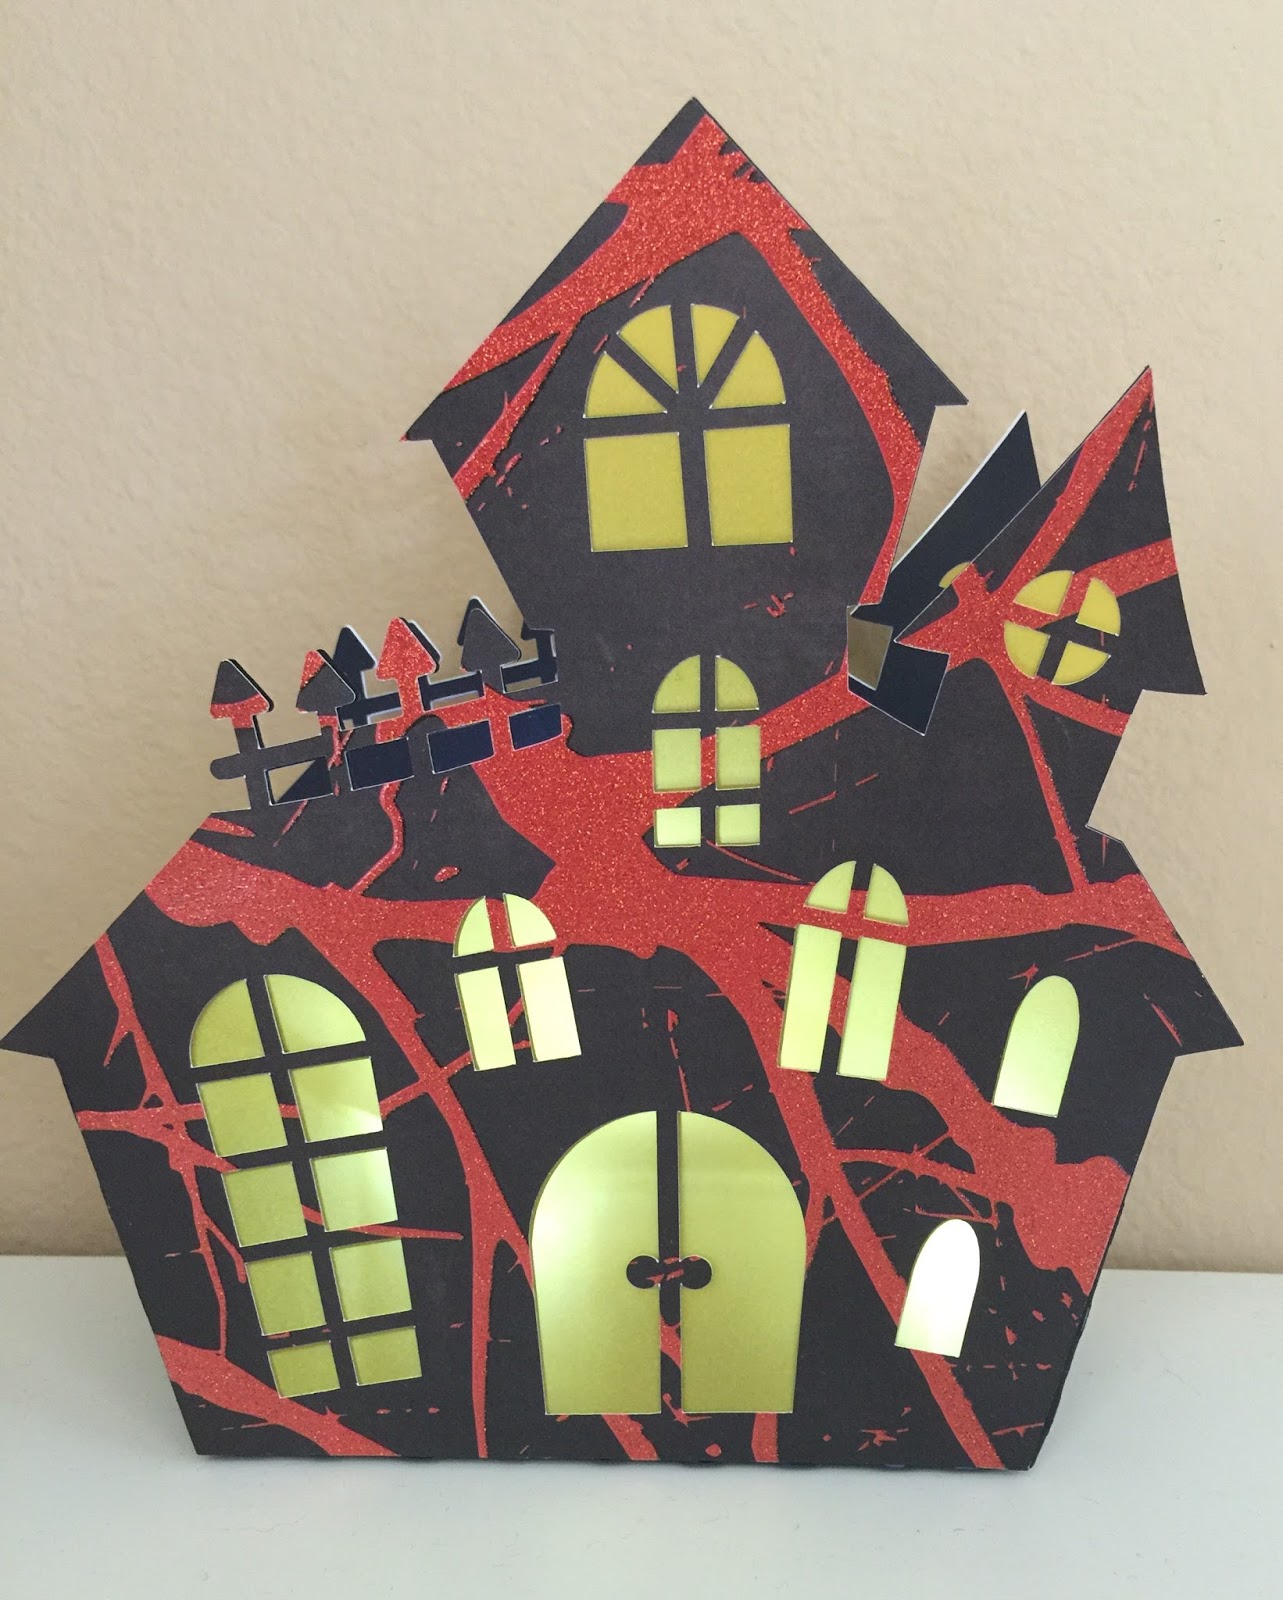
Here's a picture of the whole thing, all lit up:


I used elements from seven different Dreaming Bundles to create this colorfully spooky countdown. Working from the top down, I used the bat from the top of the Vintage Halloween Screen in  Lily's Halloween Decor bundle as the crowning element to an upside down Tick Tock Clock from the Making Time bundle.  


I used a Cricut spiderweb for the face of the calendar as I needed a web with 12 points on it since I was adding all 12 months.  The months were cutout in vinyl using a free font called Burton's Nightmare from dafont.com.  The 31 is from the same font.  The rosette in the center of the spiderweb came from the Compass Gift Box in the Good For Guys bundle.

The clockhand is from the Tim Holtz Idea-ology line - I coated it with orange Stickles to give it that wonderfully sparkly finish.  The skull and crossbones pieces are also by Tim Holtz.


The center section was actually really fun to create, but the photos didn't do a great job of showing it.  There's a new Heidi Swapp product available at select Joann's stores which is called Neon Glow. It's an 8 foot coil of battery-operated, vibrant neon wire. I used the lemon lime color to make a neon frame for my glittery ghost.  Here's what the neon looks like when you turn it on. There are two blink settings too!  


I took a video clip of the neon while I was building the project because it was so much fun to play with: 


Here's another picture of my ghostly ghoul while I was working on the middle section. The ghost is from the Shudder Shutter card from the Holiday Hauntings bundle and I have him suspended in an elongated Halloween Cookie Box which was a freebie from Dreaming Tree.  I modified the cookie box to get it to fit into the project. The idea was to make it look sort of like a pendulum in a grandfather clock.  


The bottom section is the same Tick Tock Clock as used in the top section, only this time it's right side up.  I used the frame from the front of the Lucky 7's Slot Machine in the Vegas Road Trip bundle to create the countdown window.

The word Halloween came from the Candy Dish in the Frank and Friends bundle and the 'Days To' is the Burton's Nightmare font again.  The mirrored stars from Tim Holtz were tinted with bright green alcohol ink and added to the front for some extra sparkle and interest.  

I think that about covers it from top to bottom. I've included a few more extra photos below. I really enjoyed challenging myself to create this crazy project and now I have a fun Halloween decorative piece I can use for years to come.  


We're 91 days from Halloween as of today, so there's plenty of time to create some more spooky projects.  Thanks for stopping by!

Sunday, October 8, 2017

Spinning Spider Card


I chose to keep this fun kinetic card rather simple. I didn't add a ton of bling because I really wanted the spinning of the spider to take center stage.  

This card is from the Fantasy Foals collection from Bird's SVGs and originally contained a sparkly spinning unicorn. I went with some rather bright and bold Halloween colors, black glitter cardstock and a spider in place of the unicorn. 

The spider I used is from the Spider Venom collection which is also from Bird's SVGs, but you could substitute any spider or crawly critter you desire! 

This is my first time uploading a video clip to my blog, so if it works, fantastic! If not, I'm sorry and I'll try to figure out what I did wrong. Fingers crossed that you can see the fantastic spinning action!  


On the back of the card, I added this EEK sentiment which came from Cricut Design Space. The font really seemed to perfectly match the style of the card.  


I added another spider cutout to the envelope flap as you can see pictured here:


And here's a tip for the envelope. It is not my original idea, but definitely one worth sharing. When I'm making a cardstock envelope that I know won't be used for mailing purposes, I add a Velcro dot as the closure.  This way, the envelope doesn't become too tattered, and the card can be stored in the envelope and taken out time and again to play with. You just know that a fun kinetic card is going to be handled a lot!


There are so many fun, fluttery things you could use in place of a spider. For Halloween I think a bat or ghost would look fantastic too. The possibilities are really endless. What ideas do you have for a fun spinner - I'd love to hear!

Thanks for stopping by!

Saturday, October 7, 2017

Creepy Coffin Luminary


I just loving making Halloween crafts, and I was super excited to see this creepy coffin luminary released by Bird's SVGs. It's from the new Creak 'n' Shriek collection

Creak 'n' Shriek Collection from Bird's SVGs
If you've read my blog before, you probably know how I adore things that light up, so naturally this was the first project in the collection that I just had to create. 

Not only does this project go together very easily, Bird's assembly tutorial has several helpful tips along the way, including one suggestion for avoiding wrinkly vellum on such a large piece.  Honestly, I love listening to both Bird's accent and her handy tips and therefore watch all of her videos even if I have a pretty good idea how things go together!

I followed Bird's suggestion and used some antique gold Rub and Buff wax to highlight my pieces and it really has a fantastic effect.  You can see it much better in this picture. I love the worn, vintage look this added to the piece.


On the base of the luminary, I added some dried Spanish moss to make it look like this crypt was a bit overgrown. I used some antique gold brads to the RIP plaque.


Last but not least I decided that a black rose with some gold wax highlights was the perfect finishing touch.


I've really been enjoying looking at my creepy coffin luminary every night.  It's just so cool!


Be sure to check out the full collection from Bird's SVGs - there are several amazing projects for Halloween.  I think the pop-up bat card might be next on my list.

Thanks for stopping by! I'd love to hear what you think. 

Saturday, August 20, 2016

Pumpkin Prize Ribbon

It seems like once the 4th of July has passed us by (here in the US anyway), all seasonal crafting takes a swift turn towards Halloween, Thanksgiving and Christmas. 


Every year my employer holds a pumpkin carving contest for the employees. I usually volunteer to make the prize ribbons and this year is no different.  What is different, however, is the really cool ribbon design I'm going to be using. 

Check out this ribbon from Bird's SVGs Simply the Best Card Collection that I'll be using as the base for this years' design. I made the ribbon only and not the card that goes along with it. 

Simply The Best SVG Card Collection
The scary pumpkin head is from one of Bird's many FREE collections and is called Halloween Characters. I wanted to make him look like he was lit up, so I cut a plain back panel in yellow cardstock and then mounted the front orange face piece with some foam tape to add some dimension. 

There are many different ways to create the solid back panel like I did here, it really just depends on what software you are using. I use a Cricut and I found it easiest in Cricut Design Space to simply duplicate the design and then use the contour function to hide the facial features on one of the pieces.

I'm still fiddling around with the colors a little bit. I think I might go with a bit of a deeper purple to match the lovely purple Stickles I used around the center.

While in Halloween mode, I also downloaded Bird's FREE Haunted House Card & Bag file. I enlarged the file so the house measures about 8 inches tall and 7.25 inches at it's widest point. I used some yellow vellum for the windows and added some battery-operated lights inside so this haunted house is all ready to glow through the spooky season!


If this post has gotten you in the mood to do a little bit of holiday creating, be sure to check out Bird's SVGs for some really great inspiration. I just love this bag from the Spider Venom Collection!


And if you visit Bird's Facebook page right now, you can enter for your chance to win her brand new White Christmas Collection which is being released very soon. 

Good luck and thanks for stopping by!

Friday, October 9, 2015

Black Cat Burlap Block


I just love the Black Cat Gift Bag that Mary designed for the Barn Party kit from svgcuts.com, but I didn't really have a need for a bag, so I decided to make this as a decoration instead.  I have some 5.5" burlap panels in my stash and re-sized the pieces to fit.

I was also happy to be able to use this orange pom pom fringe that I've had for a few years now.  I think I need to fluff some of them up, I just noticed that a few are looking a little flat in the photo!

I added some purple bling stickers to the corners, some green Stickles along the bottom edge of the pleated collar and some Halloween washi tape around the outside edges.  He's going to look so cute on my bookshelf!  I love how this came out.


Thanks for stopping by!

Spider Venom Bottle Label


When I purchased the Spider Venom Party Pack from birdscards.com I saw this fun bottle label which can be added to a wine bottle for some spooky goodness.

I immediately thought of a fun square bottle I have saved for the purposes of making some potion bottles and I knew that this would look great on it!  I re-sized it a bit so it would fit my bottle - the label pictured here is only about 2.5" wide!

I also had to the idea to cut the 'venom' letters out of Heidi Swapp toner paper and run this through my Minc to add some shiny, purple-foiled goodness.  It's not the easiest to photograph, but hopefully you can see the gleam in the picture below.  This angle also shows off the facets on the spider body (gem stickers) better too.

I think I'm going to fill the bottle with some bright green glittery liquid and once that's done and sealed, I'll stick my label on. I don't want to risk splashing it the bottle filling stage.

Thanks for stopping by!

Thursday, September 24, 2015

Midnight Jamboree projects


We always ship a box of autumn goodies to a family member and candy is always included. I decided to make a few projects from the Midnight Jamboree kit from svgcuts.com to go in the box. I thought this cute little candy dish would make a fun seasonal decoration to go with the sweets. 

This spooky lantern is from the same kit. These are both quick and easy little projects that make fun Halloween decor.