It's been a minute since last I posted, but I wanted to share the pictures from a project I recently completed. A friend requested a custom explosion box with a Harry Potter theme for her nine-year-old granddaughter. Things she wanted included were Hermione, Hedwig and Dobby. As a pretty big fan of the Harry Potter myself, I had a million ideas, definitely more than I could use in this single box! I kept in mind that the little girl receiving this has only seen a few of the movies and tried to narrow my options.
This post is going to be mostly a lot of pictures and list of supplies used versus a detailed step-by-step or how-to.
For the explosion box itself, I used the Gingerbread House Exploding Box SVG file from
I created panels for the sides of the box using the Tim Holtz Sizzix Brickwork 3D Texture Fade. I ran a black inkpad over the folder before embossing which brought out some of the detail. The deer are from Tim Holtz Sizzix Darling Deer and Winter Wonderland die sets. With Harry's patronus being a stag, I thought the deer would be a fun touch and provide interest to the brick walls. The Hogwarts title was cut on my Cricut using a free font called Harry P. The stones and moss are from my stash.
The centerpiece of the box interior is the Hogwarts Express. This was created using a few pieces of the Choo Choo Train SVG from Dreaming Tree's Christmas Cheer Bundle. Some Polyfil was used to make a little wisp of smoke coming out the top. I glued the train in the upright position so it would not flop over when the box is opened. On the back side of the flap/wall, I added a Platform 9 3/4 image that I found online.
The inside of the outer flaps were stenciled with the Tim Holtz Stampers Anonymous Falling Stars stencil and some gold ink before adding a house crest to each. The Hogwarts House Crests are a free svg file from Designs by Miss Mandee. She has a bunch of great Harry Potter related svgs and I used several of them in my project.
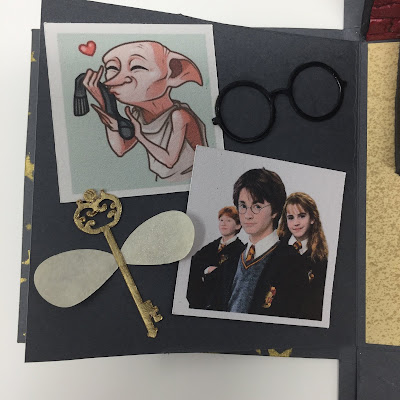
The flap to the left of the train includes a few printed pictures including Harry, Ron & Hermione as well as a cute illustration of Dobby. The flying key is from Miss Mandee and can be found here. I did alter the wings to be solid as this cut is very small and I didn't want to tear the wings trying to achieve lacy detail. I added some Perfect Pearls powder to the wings to add some shimmer. The eyeglasses I just created using a few circles.
I used a Tim Holtz Sizzix die called Santa's Helper to create the little stack of books, but this could easily be done by hand if you don't have the dies. The svg of Hedwig is another freebie from Miss Mandee and can be located here. The wand was made by running a bead of hot glue around a toothpick and then painting it. The stars are a from a Tim Holtz Sizzix die called Swirling Stars. I also applied some glittery Stickles around the stars to up the magical feeling!
The envelope is one I found online as a free svg, although I don't recall where I found it. I sized it down to fit the flap and added the desired message for the recipient. I think that pretty much covers everything inside and out.
I did add some extra pieces because I was having fun. I created this Snitch ornament using a glitter foam ball and gold wings cut out using some gold mirror cardstock and a Tim Holtz 3D Impresslit called Winged.
Last but not least I included a Howler card which I found on Miss Mandee's site. It was super easy to put together and so cute!
Merry Christmas Muggles!!!


WOW!!! :-)
ReplyDeleteThis is incredible! I can't imagine how many hours it took to put all of this together.
ReplyDeleteWOW WOW WOW!!!! This is beyond awesome Lee :-O I so love your brain and imagination <3
ReplyDelete