Showing posts with label Christmas. Show all posts

Thursday, December 7, 2017

Mini Winter Wonderland


This is a very quick post to show a project I made yesterday. It was 100% inspired by Richele Christensen's Winter Wonderland project which can be found here.

I still want to make the full-sized project at some point, but for now I've made a smaller, card-sized version using the same Tim Holtz Sizzix dies and some Chibitronics lights.  In my haste to create, I didn't think to take a picture of the circuit I set up, but it was a pretty easy one.  I used 3 white lights under some vellum to give it a bit of glow.  

And now I can't stop playing with the on/off  'switch' as it's so much fun to see this light up over and over again. I'm like a kid with a new toy!


I love this so much I'm not sure if I'll be giving it away or keeping it for myself. It's like my own personal version of a fidget spinner.  Lights on, lights off, lights on, lights off!  


One more picture from the side so you can see the pretty glitter that doesn't show up in the other shots.  

Thanks for stopping by!

Friday, November 17, 2017

It's Christmas-TIME!


And how do I know it's Christmastime?  Because I have a Christmas clock of course!

This super adorable Gingerbread House Clock file is from the Bird's SVGs Christmastime collection.  Here's a picture of the whole collection - fabulous, right? 


I chose to make mine with red accents but could really picture this in a number of different colors.  


I changed mine a little bit by adding a gingerbread snowflake to the face of my clock. This is a Cricut image from a cartridge called When It's Cold Outside. I sized it to 3.3 inches wide. I thought it was just perfect for the face of the clock. 

I also added a little peppermint candy (from Cricut Joys of the Season cartridge, cut at .75 inch wide) to the second hand of the clock, so as every second passes, the candy twirls a little bit.  


The hands that came with the clock mechanism were originally gold, but didn't show up very well against the gingerbread snowflake, so I coated them with some red Stickles and now they show up quite well and sparkle too!

And how could I forget...it's also a luminary! The whole house lights up if you add some LED tealights or a light strand inside.  I don't have a picture of mine lit up yet, but here's the picture from Bird's website. So great!


You may have noticed the pretty little white Christmas tree sitting beside my house. This was created using the FREE Swirly Christmas Trees file which is also from Bird. 


I sized mine to 7 inches tall and cut out six of them on my Cricut. Then I scored them down the center, folder them in half and glued them together to make the 3-dimensional tree.  This was originally Bird's idea, but mine is smaller than her original tree.  

Of course the Snowflake Christmas Tree in the Christmastime collection would look great with this project too. I've just been wanting to try my hand at one of the swirly trees and I think the swirls in it match the icing swirls on the clock so nicely.  

Last but certainly not least, I made the cute little Gingerbread House Card which is also from the Christmastime collection.  


I have family members who are locally famous for their annual gingerbread creations. A picture of their project always seems to end up in the newspaper every year. This is the perfect Christmas card to send to them. I just happen to have an appropriate rubber stamp sentiment for the inside too:


Whew, long post, but hopefully you enjoyed it if you've read this far!

Thanks for stopping by and be sure to check out this collection from Bird's SVGs. It's a really neat one. I loved being able to build my own special seasonal clock and it was so easy! 

Monday, July 24, 2017

SHARK!!!


Have you seen the new Jawsome collection from Bird's SVGs?  It is so much fun!!  


For some reason, I couldn't stop thinking about how I could use these cards for Christmas.
Before the collection was even released, I was making a list (and checking it twice) of puns and sayings I could use with this fabulous fish.  

Here's the first one:


and when you open it up, you get the singing shark wearing a Santa hat on his dorsal fin for the holidays! 


I laugh every time I look at it!

Next up, I turned this guy's frown upside down and gave him a Santa hat too. I also thought it might be fun to put a candy cane in his teeth - I just tucked one in there for now, but might make it double sided before I secure it onto the card because you can see it from the inside too!


On the inside:


Searching online, I found a graphic with a hilarious little edit of the Santa Claus is Coming to Town lyrics. I'm thinking about sticking it on the inside cover of the Santa Jaws card. It goes:

I see when you're swimming,
below you and your wake.
I know if you taste bad or good
so beware for goodness sake!

What do you think - should I add that, or is it too creepy for Christmas?

I created the alternate sentiments myself using fonts Milkshake and Arial Black. I jazzed up the colored words with one of my new favorite products - Wink of Stella in clear. It adds a lovely shimmer to any project and I find I'm putting it on almost everything I make!
It's hard to photograph, but you can kind of see it in this picture on the red SHARK letters.


Since I made a list already, I thought I'd share a few more Christmas puns to go with this Jawsome collection:

~ May your days be merry and bite
~ Sea-cret Santa
~ We fish you a merry Christmas
~ Season's Eatings


I sure had a lot of fun making these cards and the pop-up shark was very easy to put together if you watch Bird's assembly video.  I can't wait for an excuse to make them with the original sentiments. I love the Happy Birthday tag with the bite out of the corner - so funny and clever!

Thanks for stopping by. I hope you have a fin-tastic day!

Friday, December 9, 2016

Tis the Season


The holiday season is upon us, and as with most, I've been busy working on projects, Christmas shopping and a whole list of other things I never seem to get ahead of! In fact, I made this fun tree luminary weeks ago and am only now getting around to posting it.

This project from Bird's SVGs comes from the Home for Christmas collection (shown below) and is a fun way to create some glowing home decor for the holiday season. The paper is used is printed with colorful pom poms and I added some sequins here and there for some extra sparkle.


What is so neat about this tree is that Bird designed it in three different sizes, so you can create a forest, or pick just one to fit in where you'd like it. I made the largest version of the tree and it's large enough that it will fit an LED pillar candle inside. I opted to use a color-changing electronic tea light as it seemed to go well with the colorful paper. I must confess that I've been thinking about doing some gold and silver trees, maybe using glitter paper. The possibilities really are endless. Now all I need is an extra week in December and I should be all set!


Something I plan to make a bunch of are the cupcake boxes from Bird's Celebrate with a Cupcake collection


 Every year I tend to load up on fun chocolates and other sweet treats and give away little bags or boxes of them to friends and family. The individual cupcake box is perfect for this!


I eliminated the insert which would hold your cupcake in place, and I replaced the cupcake embellishment on the front with a little bonbon I found in Cricut Design Space. The box holds quite a bit of candy and I love the look of the top when it's all folded up...I think it looks like a swirl of icing on top of the box!


This is a very quick and easy little box to assemble, and will come in handy for lots of little gifts and treats this year. 

Last but not least, since I'm jumping all over the place with projects I thought I'd mention this lovely bag from Bird's For My Mum collection


I made this bag shortly after the collection was released, but only had this one picture of it before I added the ribbon handle and gave it away. 


I just recently stumbled across this photo and started thinking how lovely this bag might look with a poinsettia on the front for holiday gift giving. Red on white maybe. White on pink? Your imagination is the limit.

As always, thanks for stopping by and I hope your holidays are a joy!

Friday, August 26, 2016

Not so white Christmas!

I was eagerly anticipating the release of the White Christmas collection from Bird's SVGs as I just fell in love with the preview photos and all of the layering and different types of cardstock used in the projects. 

White Christmas from Bird's SVGs
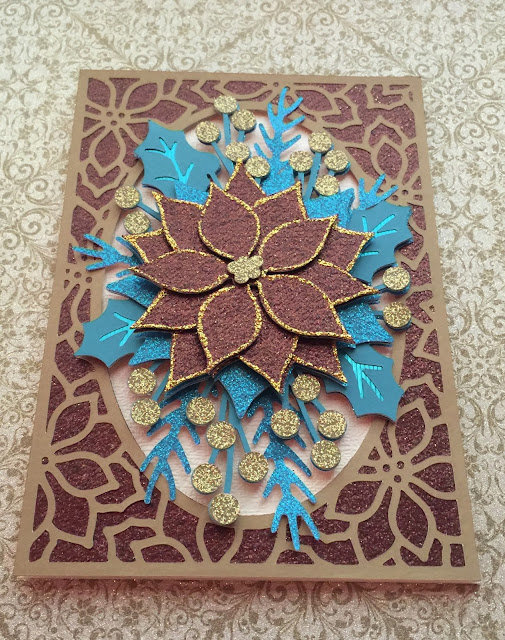
I started sifting through my stash looking for some nice pearl, glitter and mirror cardstock to create my own version of the lovely poinsettia card. I've recently been admiring some beautiful Christmas trees and decorations done in brown, green and teal. As I had some of those colors in my supply, my project went from white Christmas to peacock colors in the blink of an eye!


My love of paper might be matched by my love for glitter and shimmer in crafting. I'm still undecided if I went overboard on the glitter here, but I figure if you can't go all out glitzy for Christmas then you never can!

The base of the card is a cream pearl layered with brown glitter and a brushed gold for the lacy layer around the oval. The teal colors are from glitter, foil (as seen in the leaf veins) and plain cardstock. Here's a picture at a slight angle so you can see the shimmer from the foil on the teal leaves.


The berries and center of the poinsettia are cut from gold glitter and the poinsettia itself is the same brown glitter cardstock used in the background. I edged the brown poinsettia leaves in gold so the layers would stand out as they are dark in color and the shadows from the layering didn't show up as much as I wanted them to. This also ties in the gold berries and center piece.

One of my favorite things about this card is the dimension from layering. This isn't the best photo, but you get the idea. Layers of goodness here! 


In the process of auditioning papers for this project, I made a second poinsettia from a patterned gold glitter paper. It obviously didn't end up this card, but it might just go on another one! Other ways to use this poinsettia might be as an ornament for a Christmas tree, a lovely addition to a bow on top of a gift, or maybe even with a pin glued to the back so it can be worn as a piece of jewelry over the holidays. 


So be sure to check out all of the wonderful holiday projects at Bird's SVGs, many of which are completely free. I made this card from the Let It Snow collection last year. There are lots of lovely designs to choose from.


Happy weekend and thanks for stopping by!

Saturday, December 26, 2015

Piano Box Card


I decided to add a few Christmas touches to the SVGCuts.com Piano Box Card from the Summer Box Cards kit.

Instead of using the flowers that came in the kit, I miniaturized some poinsettias from the wreath in the Santa's Surprises kit which is also from SVGCuts.


I even found a teeny tiny snippet of Silent Night sheet music in my Tim Holtz stash that I added. Love it! I'm so pleased with how this turned out. 

Thanks for stopping by!

Disney Explosion Box


At the request of a good friend, I set out to create a spectacular Disney-themed explosion box for her to use when gifting some theme park passes this Christmas.


I neglected to take pictures of a lot of things along the way, and these are by no means detailed instructions, but here' the basic gist of it:

I started out my box using the SVGCuts.com Small Snowflake Box from the Winter Gazebo kit. To turn it into an explosion box, I cut the pieces called 'bottom sides' into 6 panels. I left the tabs at the bottom for gluing, but the panel on the right has a side tab that is not needed, so I cut it off as well. When all was done, I had six panels that looked like this:

Next I cut out the pieces called 'bottom' - two hexagons - and set about gluing my 6 panels to the largest bottom piece, one on each of the six sides.. I used the leftover hexagon bottom to cover up the glued tabs and finish it off neatly.

I used my Cricut Disney cartridge to cut out the various characters and decorated the panels with an embossed background, the characters and some bling to weight down the flaps.  Mickey and Minnie are mounted on some acetate strips, so they move around and look like they're really jumping for joy! The flap with Mickey's hand is a pull-out pocket where I added a message about going to Disney.


I added a sliceform tree that I found a pattern for online. It required a lot of tweaking, but I got it to work out for me. I stuck it on a doily 'tree skirt' with some hot glue and added some mini presents to finish off the inside.

For the exterior, I created some decorative panels in red to go around the outside panels and added white ovals to the two front panels to look like Mickey's pants buttons.

I made the plain box lid (in the extras folder) and decorated it with some festive greenery (from a Cricut cartridge) on the outside and then hid a little surprise for one of the recipients (also a Star Wars fan) on the inside of the lid.


The idea for the Mickey ears came from Sharalyn Morgan's blog post called Minnie Ears for Crystal
I used the SVGCuts.com Baseball Cap file from the Fun and Games kit to get this started.  I made my ears slightly different than Sharalyns in that I omitted the bow, put the ears in different placement due to how I wanted the box to face, and then I glittered the ears themselves and then sealed them with some Mod Podge so the glitter wouldn't get all over EVERYTHING!


Once the ears were all put together, I glued the baseball cap top (with ears) to the baseball cap base with some hot glue around the inside of the box.  The ears are what is going to be used to open the explosion box, so I needed it to stay together.

After the baseball cap/ears box was one glued unit, I then glued that to the top of the snowflake box lid:


 to get this:

Clear as mud, right?!!  Anyway, I think you get the idea. All you do now is lift up on the ears and the box 'explodes' open.

I'm told this project was a huge hit Christmas morning and I'm so very glad. It was a fun challenge to create this and come up with different ideas for how to make it special.

Thanks for stopping by!

Saturday, October 31, 2015

Nativity Paperscape Card


I think the paperscape cards from Dreaming Tree are just so cool!  This Nativity card is from the Christmas Paperscape Cards collection.  As mentioned here previously, I just love projects that I can light up, so this is right up my alley. 

I frequently leave my cards unfinished (as I've done here) so that I can personalize them down the road when I decide who the recipient will be. I will likely add a foil message in the top section using my Minc machine, but I haven't made up my mind what I want to say yet.

I'm primarily posting this now because of the happy accident I discovered when gluing it all together. I used some starry looking paper from an old DCWV Christmas paper stack to cut out the background piece. It has the lyrics to "We Three Kings of Orient Are" printed in swirls all over the paper. I just stuck the 12x12" paper to my Cricut mat and hit go.

Check out where the "O Star of wonder..." lyric shows up on the paper.  The star placement couldn't be more perfect if I had planned it that way.  In fact, if I had tried to place the star where it landed, this probably would never have happened!!  #fuzzymathskills


I guess I was meant to use this paper for this particular project.  Couldn't be happier with the result.

Thanks for stopping by!

#xmaspaperscape3dsvg

Winter Village Box Card


It seems funny to say "Happy Halloween" when I'm here to show off some Christmas projects, but that's just the way it goes sometimes when it comes to seasonal crafting!

I just love Mary's new release of the More Christmas Box Cards kit at svgcuts.com. This Winter Village Box Card is one of my favorites in the kit (although I truly love them all) and so I thought I'd give it a go.

Katarina Ewa posted a picture of her version the other day where she altered the kit ever so slightly to create a vellum window in the front and put a small battery tea light inside.  I'm a sucker for anything that lights up and glows, so I had to try it too.  I love the result!  Thanks for the great idea Katarina!


Of course once I did that my wheels were turning and I had the idea to turn this card into a faux snow globe shaker card. I just recently picked up a Fuse tool at the craft store (using a 60% off coupon - what a deal!) and used it to create a round shaker pocket with some coordinating glitter, sequins and microbeads in it.

At first I tried it without a background paper, but I could see the bottom of the other layers through the window, so I just stamped the bottom of the front fence layer with some snowflakes and glued it in to provide a background for the shaker pocket.  Love it!


This was a really fun project to create and was really simple to cut out and assemble.  Now I have to decide which one I'll take on next - I think it might be the Front Door card.  

Have a great day. Thanks for stopping by!