Showing posts with label 3d svg. Show all posts

Sunday, May 7, 2017

It's Tiki Time!


Lately I've been wanting to make some bright, colorful and beachy summer craft projects. I've had this one in my head for a while. This tiki lantern is inspired from a card in the Club Tropicana kit from Bird's SVGs.

Here's a picture of the kit and the specific card that inspired this project:


These projects had me imagining a fabulous party on a tropical beach somewhere. So of course the party needs tiki torches for after the sun goes down!   

The four-sided lantern 'shade' sits on a base that I adapted from the Bird Cage Luminary base in the Love Birds kit, also from Bird's SVGs.  Instead of using two short and two long base pieces, I just cut out four of the short base pieces to form a square shape. The bottom panel square is 5" and the top panel square is 4", but you could obviously resize this to any size you want. 

One thing I learned through trial and error was to remember the height of the base 'step' that your lantern shade will be sitting on.  I made mine only to discover that when I slipped the shade on, my little tiki guy's toes weren't getting any light shining through because of the height of the base.  I remedied this problem with some bamboo kitchen skewers!

I cut the skewers to fit the width of the base and glue two on each side as risers for the shade to sit on. Ideally I could have redesigned the shade to include more space at the bottom below his feet, but I actually really like the look of the bamboo for this type of project, so I'll just chalk it up to a happy accident.


I embellished with colorful flowers and foliage from Tim Holtz's Tropical thinlet set. And of course I added a little glitter to the hibiscus flower stamen. I do so love glitter and glow!!

I only added the palm 'crown' to the front panel of the lantern as you won't see the other sides where I'll be displaying it, but you could certainly have a ball adding all kinds of embellishments to this little guy. 


I'm so pleased with how this project turned out. The flickering tea light inside really makes this look like it could be a torch. I think these would be so much fun as centerpieces for a luau-themed party!


Anybody ready for a tropical drink yet?  

Thanks for stopping by. As always, I'd love to hear what you think, so feel free to leave a comment below.  

Sunday, February 12, 2017

Lovebirds


With Valentine's Day just two days away, I couldn't resist putting together this lovebird birdcage design which is from the recently released Love Birds kit from Bird's SVGs.


As you can see, this kit is filled with amazing projects. Isn't that heart-shaped bag just gorgeous? Paired with the swan card, I could see this as a unique an beautiful way to give a wedding gift to a special couple. 

Not only is the birdcage so pretty all by itself, the part that hooked me was the fact that it's also a lantern if you want it be.  By day, it's a pretty home decor piece. By night - SURPRISE! - there are a pair lovebirds in there!!


First I built the project as designed, but then decided to add some flowers for a pop of color since I went with some rather neutral paper to start with. 


These flowers can all be found as a completely free download from Bird's SVGs as well. The freebie bundle is called Flower and Leaf SVGs.  I used the first of the three rolled flowers shown below to add the yellow roses to my project.


I was pleasantly surprised at how easy this project is to put together. It looks very intricate and difficult, but really, it couldn't be easier and goes together rather quickly. 

I love this project so much, I decided to make a second one as a gift for a flower and bird loving family member. Her favorite color is red, so I had fun picking out some poppy paper from the DCWV Garden Charm stack and adding some poppies to the project, also free from the Flower and Leaf bundle.


The patterned paper was too creamy to be a white, but too white to be a true cream color, so I spent some time inking the edges with some Tim Holtz shabby shutters Distress Ink and used a cream colored cardstock for the base pieces. It might not stand out initially, but if you look at the pieces side-by-side below, I think you can see what a difference the inking makes. I love how much depth it can add to projects too.


Last but not least, I added a secret detail to my bird cages because it makes me giggle a little every time I think of it. What do most folks used to line the bottom of their bird cages? If you guessed newspaper, you'd be right!  So I created an extra panel of my own that was cut from some newsprint looking cardstock and added it to the inside. I'd like to think the recipient will like my little joke when they see it too!


Thanks for stopping by and be sure to visit Bird's SVGs for some wonderful projects to fit your every need or creative whim. While you're there, you should check out Bird's newsletter too. It's a brand new feature and if you read Bird's latest blog post here you can learn how to receive future coupons and deals just by receiving the newsletter.

Have a happy Valentine's Day! 

Tuesday, January 31, 2017

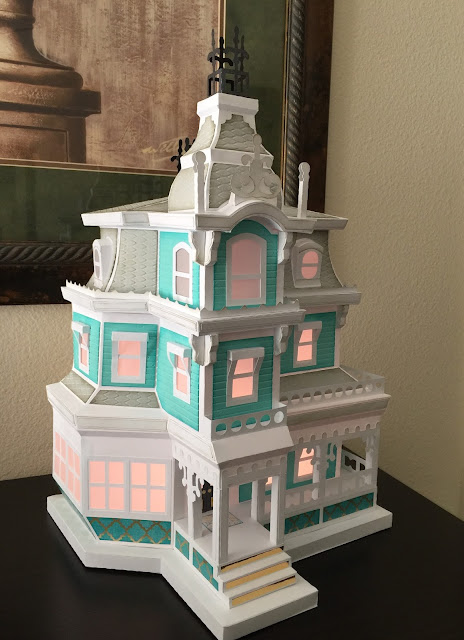
Magnolia Manor - Key West style


Since I live in a warm, sunny climate, I'm always looking to make projects that reflect local areas. In Florida, many homes are painted in colors you might not find elsewhere around the country. Whether bright or pastel, there's no shortage of pink, minty green, yellow and blue in the local neighborhoods. 

I've never had the chance to visit Key West, but have seen some photos of brightly colored Victorian homes, so I'm going to imagine that my Magnolia Manor is sitting right in the heart of Key West. Magnolia Manor is the most recent offering from SVGCuts.

This was definitely one of the most challenging projects I've attempted to date, and it didn't necessarily come out as perfectly as I would have liked. That said, it's just paper and it was fun to play with, so I'm taking the advice of Tim Holtz who encourages us all to embrace imperfection!  And if you only look at it from certain angles, you don't even see my goof ups. 
😀


If you've ever read the poem "There was a Crooked Man" I'll just say that this might be where he lives! I really am good with it though. We get a lot of hurricanes here...

I used a mesh embossing folder from Tim Holtz (shown below) to create the roof panels, but I flipped it over backwards to get the scalloped roof tile look rather than embossed mesh.  


I used some shiny gold paper to add brass kick plates to the front door along with some tiny brass doorknobs. 

All in all, I had a lot of fun inking and planning out the colors and details for this project and am already pondering what I'll add to it before next Christmas rolls around. Maybe some palm trees with ornaments!

As always, thanks so much for stopping by to check out my Key West Magnolia Manor!  I always love to hear what you think. 

Friday, November 4, 2016

Turkey Lurkey


With Thanksgiving just under three weeks away, I've been thinking about some holiday decor. Once the Halloween stuff is put away, I like to decorate with autumn themes in preparation for Thanksgiving. I know some have moved on to Christmas decorating already, but I really like to enjoy the fall season as long as I can before breaking out the red and green!

I've had this little turkey in my head ever since Bird released the Autumn Leaves kit which you can find here in the Bird's SVGs store. It's loaded with beautiful projects and I fell in love with the Maple Leaf Bunting right off the bat. 


About five years ago, Tim Holtz made some adorable Quirky Turkeys using his rosette dies. I thought they were so cute and made some straightaway. Bird's lovely maple leaf had me reinventing that little turkey in my head!

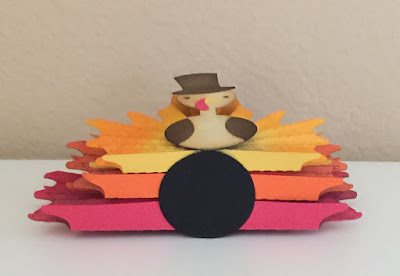
Turkey Lurkey only stands about 3.5" tall and is maybe 5" wide. I used the maple leaf in the Extras folder because it doesn't have a hole in it for stringing. I sized the leaves to the following widths:

     small yellow:           4.72" wide
     medium orange:     5.72" wide 
     large red:                6.72" wide 

Before assembling the leaves, I did some inking on the edges and down the centers to add a bit of gradient, but I probably would have had better results if I started with some lighter colored papers. In the picture below, you can see some of the green in the center of the yellow leaf, but it was mostly covered up when I added the turkey body. I'll bet this would look so cool with some seasonal printed papers as well.


Because the leaves are much smaller than if you made them into a bunting, I used some craft tweezers to help me pinch the pieces together when gluing as I couldn't really fit my fingers in there very well.  

Once all the leaves were pleated and glued, I stuck them together with some 3d sticky dots to space them out a little bit and add even more dimension. You can see them a little bit from this side view:


Then just to make sure they stayed together and also to add a little bit of a base, I hot glued the cluster of leaves to a 1.25" circle that I had leftover from another project. The color doesn't matter as you can't see it from above. View from the bottom:


Last but not least, I added a cute turkey body from the Cricut Create a Critter cartridge. I sized him to be 2.5" high. He was stuck to the front of the leaves with another 3d sticky dot.
Bird also has a very cute turkey in her free Thanksgiving bundle that would work as well. I just fell for the top hat!


I can picture Turkey Lurkey on the dining table as part of the table setting. If you replace the turkey body with a circle or other shape, you could write guest names on it and use it as a place card too. By using larger sized leaves, I think you could even make a turkey centerpiece!  

Well I'm glad to have gotten Turkey Lurkey out of my brain and into a project. I'd love to hear what you think in a comment below. Also, be sure to post a picture on Bird's facebook page if you make any of her projects. Every month somebody wins a $10 gift card to Bird's SVGs shop just by sharing.
See you next time and thanks for stopping by!