Sunday, February 12, 2017

Lovebirds


With Valentine's Day just two days away, I couldn't resist putting together this lovebird birdcage design which is from the recently released Love Birds kit from Bird's SVGs.


As you can see, this kit is filled with amazing projects. Isn't that heart-shaped bag just gorgeous? Paired with the swan card, I could see this as a unique an beautiful way to give a wedding gift to a special couple. 

Not only is the birdcage so pretty all by itself, the part that hooked me was the fact that it's also a lantern if you want it be.  By day, it's a pretty home decor piece. By night - SURPRISE! - there are a pair lovebirds in there!!


First I built the project as designed, but then decided to add some flowers for a pop of color since I went with some rather neutral paper to start with. 


These flowers can all be found as a completely free download from Bird's SVGs as well. The freebie bundle is called Flower and Leaf SVGs.  I used the first of the three rolled flowers shown below to add the yellow roses to my project.


I was pleasantly surprised at how easy this project is to put together. It looks very intricate and difficult, but really, it couldn't be easier and goes together rather quickly. 

I love this project so much, I decided to make a second one as a gift for a flower and bird loving family member. Her favorite color is red, so I had fun picking out some poppy paper from the DCWV Garden Charm stack and adding some poppies to the project, also free from the Flower and Leaf bundle.


The patterned paper was too creamy to be a white, but too white to be a true cream color, so I spent some time inking the edges with some Tim Holtz shabby shutters Distress Ink and used a cream colored cardstock for the base pieces. It might not stand out initially, but if you look at the pieces side-by-side below, I think you can see what a difference the inking makes. I love how much depth it can add to projects too.


Last but not least, I added a secret detail to my bird cages because it makes me giggle a little every time I think of it. What do most folks used to line the bottom of their bird cages? If you guessed newspaper, you'd be right!  So I created an extra panel of my own that was cut from some newsprint looking cardstock and added it to the inside. I'd like to think the recipient will like my little joke when they see it too!


Thanks for stopping by and be sure to visit Bird's SVGs for some wonderful projects to fit your every need or creative whim. While you're there, you should check out Bird's newsletter too. It's a brand new feature and if you read Bird's latest blog post here you can learn how to receive future coupons and deals just by receiving the newsletter.

Have a happy Valentine's Day! 

Tuesday, January 31, 2017

Magnolia Manor - Key West style


Since I live in a warm, sunny climate, I'm always looking to make projects that reflect local areas. In Florida, many homes are painted in colors you might not find elsewhere around the country. Whether bright or pastel, there's no shortage of pink, minty green, yellow and blue in the local neighborhoods. 

I've never had the chance to visit Key West, but have seen some photos of brightly colored Victorian homes, so I'm going to imagine that my Magnolia Manor is sitting right in the heart of Key West. Magnolia Manor is the most recent offering from SVGCuts.

This was definitely one of the most challenging projects I've attempted to date, and it didn't necessarily come out as perfectly as I would have liked. That said, it's just paper and it was fun to play with, so I'm taking the advice of Tim Holtz who encourages us all to embrace imperfection!  And if you only look at it from certain angles, you don't even see my goof ups. 
😀


If you've ever read the poem "There was a Crooked Man" I'll just say that this might be where he lives! I really am good with it though. We get a lot of hurricanes here...

I used a mesh embossing folder from Tim Holtz (shown below) to create the roof panels, but I flipped it over backwards to get the scalloped roof tile look rather than embossed mesh.  


I used some shiny gold paper to add brass kick plates to the front door along with some tiny brass doorknobs. 

All in all, I had a lot of fun inking and planning out the colors and details for this project and am already pondering what I'll add to it before next Christmas rolls around. Maybe some palm trees with ornaments!

As always, thanks so much for stopping by to check out my Key West Magnolia Manor!  I always love to hear what you think. 

Tuesday, January 17, 2017

Love Bug Box


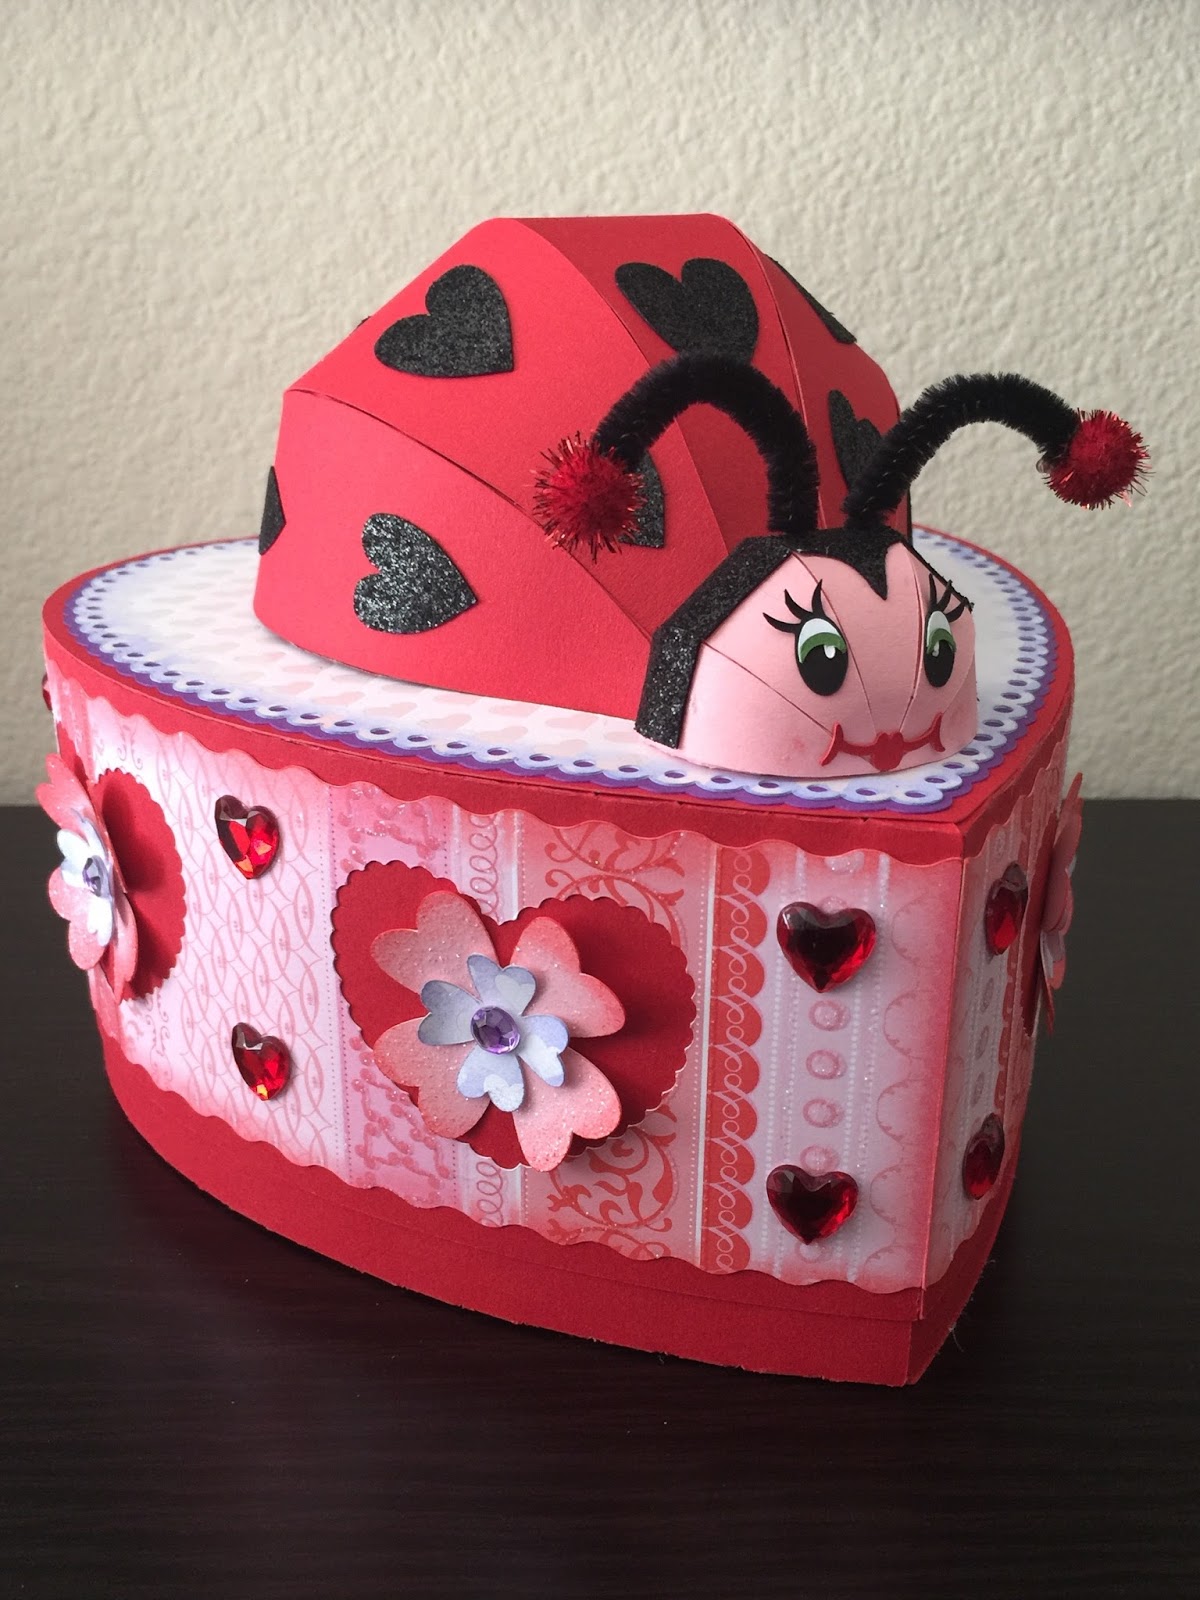
From the moment I saw the 'coming soon' post on Instagram for this ladybug box, I was in love! Ladybugs hold a special place in my heart and as a result, I have a small but unique collection of ladybug treasures that I've accumulated over the past 25 years. Because of this, I was understandably excited to see two of my favorite things, ladybugs and paper, come together in this adorable 3D box from Dreaming Tree's Love You More bundle.


I have no intention of using this box as a mailbox or bank, so I hid the contours for the mail slot when I was laying this out in Cricut Design Space prior to cutting. You can see above that I added some hearts to the back center panel of the ladybug's body where the slot would have been. I also changed the direction in which the hearts point.


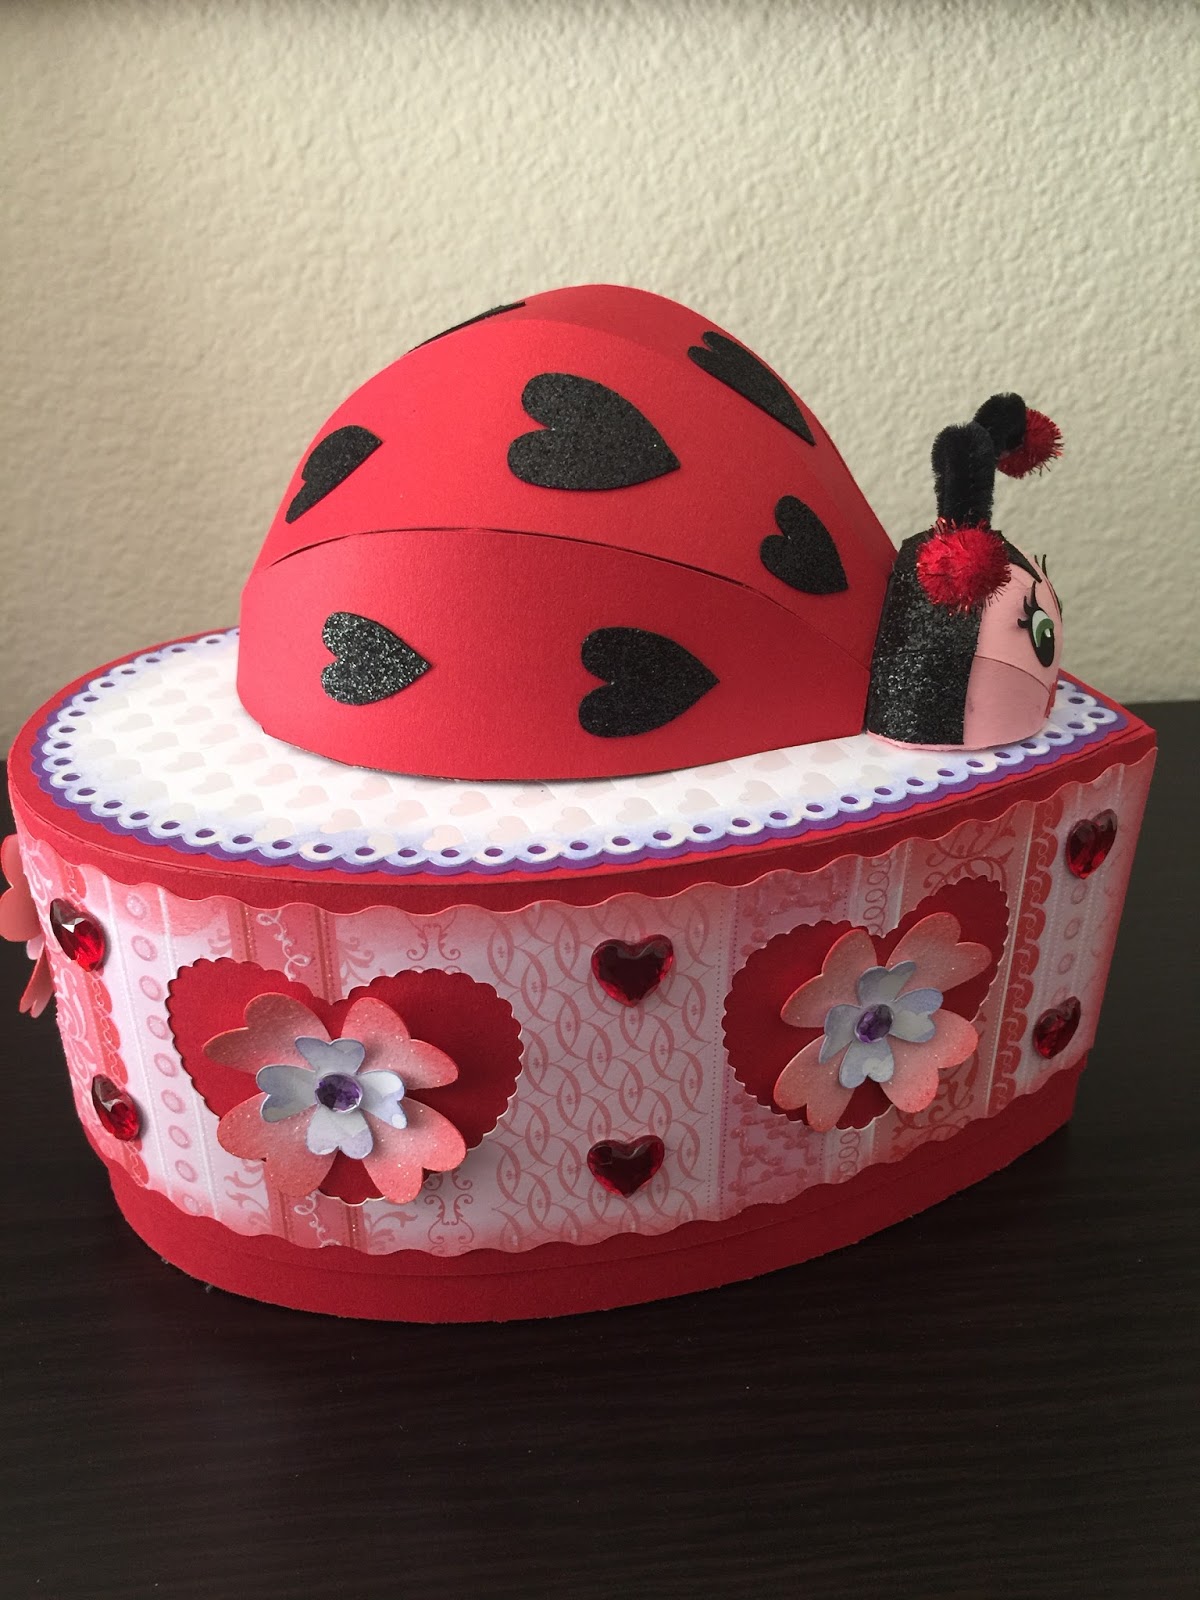
This side view shows how I redistributed the hearts on the ladybug body as well as some of the flower embellishments. 

I cut  the larger flower out of light pink glitter paper and inked the edges with some abandoned coral Distress ink. The smaller flowers were cut from the same pearl paper I used on the top of the box which is pearl heart print which I also inked with Distress, this time in shaded lilac.  


I liked how the purple gems in the original project tied the colors all together, but I didn't have any purple gems. Alcohol ink to the rescue! I simply dabbed some Purple Twilight alcohol ink from Ranger onto some clear gems and behold...purple gems! I use this little trick a lot to create gems, pearls and other embellishments that match my project color scheme.


The pipe cleaners I have are so thick and fuzzy that when I tried to loop them, they looked large and rather silly, so I kept them short and hot glued some glittery red pom poms to the ends.  


I love how this project came together and am so thrilled to finally have a 3D paper ladybug! I think I'll be making more of these in the future.  

Thanks for stopping by!  

Saturday, January 14, 2017

Lever Love


With Valentine's Day just a month away, I decided to make this Celtic Heart Lever Card from Bird's SVGs Celtic Charm Collection.

Celtic Charm SVG Collection from Bird's SVGs

Lever cards are so cool because of the lever action of the main focal point when the card is opened and closed. What a fun surprise for the recipient!


Because I fell in love with this shabby floral print paper, I picked a less conventional brown and pink color scheme for this card as it seemed to go together really well. I added some very tiny gems here and there on the floral print just to add a little bit of sparkle. 

On the inside, I did some stenciling on the three hearts using distress ink and the Tim Holtz layering stencil called Doily. I think the vintage lace pattern matches the shabby look of the patterned paper.


The sentiment panel in the middle (where you see the empty brown spot) is just waiting for me to decide what I want to write and/or stamp in there. 

I frequently leave the sentiment panels unattached until I'm sure of who the card is going to and what I want to say. That way, if I want to use a rubber stamp or add some inking, it's not too late because it's already been glued down. And let's face it, sometimes a stamped image doesn't turn out as you'd hoped. I like the option to be able to flip it over and use the other side rather than having to cut a new piece to glue over the first one in order to hide the mistake. Can you guess this may have happened to me a time or two? 

For another fun Valentine's Day card, you can find my post about this pretty rose card that was made from Bird's Roses are Pink collection last year. 


And, in addition to these lovely collections, Bird has section of completely free Valentine's projects which can be found here.  

As always, thanks for stopping by! I'd love to hear what you think about these projects.

Saturday, December 31, 2016

12 Tags of 2016: December Edition


As usual, I've cut it right down to the wire getting my tag done for this month, but I did spend a lot of time thinking about it. The ideas all fell into place a few days ago. As Christmas has now passed, I used the upcoming new year as my inspiration.

I wanted to use brushed pewter stain, but wasn't sure how that would show up on the burlap, so I opted for a piece of the textile surfaces linen instead and used the Nordic stencil. I really like the subtle shimmer of the pewter stain on the linen. I distress the edges a bit and inked with stormy sky and chipped sapphire ink around the edges. 


I continued to use silver throughout the tag, including silver embossing powder on the 'go see do' shadowpress, used some silver metallic ribbon trimmings behind the shadowpress panels and obviously the snowflakes and gears are all cut out in silver as well.  I actually added some metallic mixative alcohol ink to the arrow to make it more silvery.

The arrow on the calender tile piece is symbolic of the start of a new year, as well as the ball dropping in Time's Square on New Years Eve. I used alcohol ink to tint a gumdrop a lovely aqua color (a favorite color of mine) and added it to a few layered mini snowflakes to represent the infamous ball. I added some mercury glass Stickles to add a little bling reminiscent of the sparkling ball as well.


The snowflakes (mini paper snowflakes thinlit) and gears (gearhead thinlit) represent the transition from the holiday season into the new year and time to get back to work and busy with new endeavors. 

The snowflake with the hope token and mirrored star is a tribute to Carrie Fisher. I've been a huge fan of Star Wars since I was a child and have lived long enough to have seen every single film in the theater. It was a sad and sentimental day when I saw Rogue One the day after her passing. Anyone who has seen the film will understand why I chose the message of hope to represent her.  

The clock and 17 number brad represent the passage of time into the new year, 2017. The 17 was filled in using picket fence distress crayon. I mounted it on a square of green Nordic print from the Tidings paper collection and edged it with some stormy sky and chipped sapphire ink before deciding to add some rock candy glitter too. Love the icy sparkle this adds. 

Last, I used some brushed pewter stain over the 'auld lang syne' chit chat sticker and attached it with the mini attacher to a remnant piece of navy cardstock. 

Thanks so much for stopping by to check out my tag and last blog post of the year. I can't wait to see what 2017 brings! Go. See. Do. 

Wishing you all a very happy new year!

Friday, December 9, 2016

Tis the Season


The holiday season is upon us, and as with most, I've been busy working on projects, Christmas shopping and a whole list of other things I never seem to get ahead of! In fact, I made this fun tree luminary weeks ago and am only now getting around to posting it.

This project from Bird's SVGs comes from the Home for Christmas collection (shown below) and is a fun way to create some glowing home decor for the holiday season. The paper is used is printed with colorful pom poms and I added some sequins here and there for some extra sparkle.


What is so neat about this tree is that Bird designed it in three different sizes, so you can create a forest, or pick just one to fit in where you'd like it. I made the largest version of the tree and it's large enough that it will fit an LED pillar candle inside. I opted to use a color-changing electronic tea light as it seemed to go well with the colorful paper. I must confess that I've been thinking about doing some gold and silver trees, maybe using glitter paper. The possibilities really are endless. Now all I need is an extra week in December and I should be all set!


Something I plan to make a bunch of are the cupcake boxes from Bird's Celebrate with a Cupcake collection


 Every year I tend to load up on fun chocolates and other sweet treats and give away little bags or boxes of them to friends and family. The individual cupcake box is perfect for this!


I eliminated the insert which would hold your cupcake in place, and I replaced the cupcake embellishment on the front with a little bonbon I found in Cricut Design Space. The box holds quite a bit of candy and I love the look of the top when it's all folded up...I think it looks like a swirl of icing on top of the box!


This is a very quick and easy little box to assemble, and will come in handy for lots of little gifts and treats this year. 

Last but not least, since I'm jumping all over the place with projects I thought I'd mention this lovely bag from Bird's For My Mum collection


I made this bag shortly after the collection was released, but only had this one picture of it before I added the ribbon handle and gave it away. 


I just recently stumbled across this photo and started thinking how lovely this bag might look with a poinsettia on the front for holiday gift giving. Red on white maybe. White on pink? Your imagination is the limit.

As always, thanks for stopping by and I hope your holidays are a joy!

Friday, November 4, 2016

Turkey Lurkey


With Thanksgiving just under three weeks away, I've been thinking about some holiday decor. Once the Halloween stuff is put away, I like to decorate with autumn themes in preparation for Thanksgiving. I know some have moved on to Christmas decorating already, but I really like to enjoy the fall season as long as I can before breaking out the red and green!

I've had this little turkey in my head ever since Bird released the Autumn Leaves kit which you can find here in the Bird's SVGs store. It's loaded with beautiful projects and I fell in love with the Maple Leaf Bunting right off the bat. 


About five years ago, Tim Holtz made some adorable Quirky Turkeys using his rosette dies. I thought they were so cute and made some straightaway. Bird's lovely maple leaf had me reinventing that little turkey in my head!

Turkey Lurkey only stands about 3.5" tall and is maybe 5" wide. I used the maple leaf in the Extras folder because it doesn't have a hole in it for stringing. I sized the leaves to the following widths:

     small yellow:           4.72" wide
     medium orange:     5.72" wide 
     large red:                6.72" wide 

Before assembling the leaves, I did some inking on the edges and down the centers to add a bit of gradient, but I probably would have had better results if I started with some lighter colored papers. In the picture below, you can see some of the green in the center of the yellow leaf, but it was mostly covered up when I added the turkey body. I'll bet this would look so cool with some seasonal printed papers as well.


Because the leaves are much smaller than if you made them into a bunting, I used some craft tweezers to help me pinch the pieces together when gluing as I couldn't really fit my fingers in there very well.  

Once all the leaves were pleated and glued, I stuck them together with some 3d sticky dots to space them out a little bit and add even more dimension. You can see them a little bit from this side view:


Then just to make sure they stayed together and also to add a little bit of a base, I hot glued the cluster of leaves to a 1.25" circle that I had leftover from another project. The color doesn't matter as you can't see it from above. View from the bottom:


Last but not least, I added a cute turkey body from the Cricut Create a Critter cartridge. I sized him to be 2.5" high. He was stuck to the front of the leaves with another 3d sticky dot.
Bird also has a very cute turkey in her free Thanksgiving bundle that would work as well. I just fell for the top hat!


I can picture Turkey Lurkey on the dining table as part of the table setting. If you replace the turkey body with a circle or other shape, you could write guest names on it and use it as a place card too. By using larger sized leaves, I think you could even make a turkey centerpiece!  

Well I'm glad to have gotten Turkey Lurkey out of my brain and into a project. I'd love to hear what you think in a comment below. Also, be sure to post a picture on Bird's facebook page if you make any of her projects. Every month somebody wins a $10 gift card to Bird's SVGs shop just by sharing.

See you next time and thanks for stopping by!  

Sunday, October 30, 2016

12 Tags of 2016: October Edition


Well, I can't believe it's been over a month since my last post! I had some deadlines to meet and hopefully can get back to some normal posting again. 

I'm glad I was able to spend some time getting my tag done today, because I was thinking about all week. I didn't have any of the monster dies like Tim used - see Tim's original post here - so I jumped straight to Christmas and was able to use all of the same techniques.

I used some paper from Tim's Tidings holiday stack and cut it up into little bits of ephemera for collaging with. 

I covered my finished patchwork with crazing collage medium, let it dry and added some hickory smoke crayon around all of the edges.


This picture shows a close up of the wonderful cracks that the crazing medium creates when dry. It reminds me of old porcelain.  This picture also shows the little pincone adornment I added to the ribbon. Before I added it, I dabbed it lightly with some glossy accents and dipped it in vintage platinum distress glitter dust. It's hard to see in the photo, but really adds some lovely sparkle.

I also used my spatter brush to add some white paint/snow to the surface once all of the crayon had been added and worked into the crazing.

I think the tattered poinsettia die with coordinating texture fade came out so cool when cut from adhesive foil stuck to cardstock.  I used the same technique Tim did for painting and then wiping away, but more color stayed in the debossed area as it's hard to wipe it away from all the nooks and crannies. I love how the colors came out.  

Once the paint dried, I did add a little crayon on the poinsettia as well, just to add some shading. I also added some distress glitter in mustard seed as the poinsettia center. 


Thanks for stopping by to check it out!

Thursday, September 22, 2016

Acorn Shaker Card


Happy first day of Fall!  This is my favorite season of the year and I had to celebrate with this fun acorn shaker card.  Or as I like to think of it in my head, a shake-orn!  

When I saw the adorable acorn shaker placecard in the new Autumn Leaves kit from Bird's SVGs, I just knew I had to make it. What's better than sequins and celebrating the colors of Fall?

Autumn Leaves from Bird's SVGs

I decided to make this into a full-sized card by enlarging the shaker pieces in my Cricut software. The acetate piece is 3.88" in height if you want specifics. 

I also decided to pull out some of my rubber stamps to add a sentiment and a few autumn flourishes. Before I glued the acorn walls to the card front, I strategically stamped and embossed with gold embossing powder a Happy Fall message that would go inside the acorn.  


Because I wanted to make sure the message was visible, I didn't add as many sequins as I normally would for a shaker, but I think it's still enough to add some fun movement to the card. I went with browns and golds for the acorn cap, and a mix of some yellow, orange, red and gold leaves for the bottom of the acorn. 

These colors remind me so much of the seasonal changing of the leaves. I used a piece of brown glitter card stock as the card base which adds an extra layer of sparkle.  

With this acorn being eight layers thick, there were a bunch of leftover acorn caps and bottoms when all was said and done. 


Using some Distress inks and an embossing folder, I added some color to the leftover pieces and built myself some more acorns which I can use on other projects, cards or even as little gift tags!  


Bird generously offers her new kits at a discount during the first week of sale, so be sure to check out the the Autumn Leaves kit in the next few days to enjoy the special!

Did you know that if you make one of Bird's projects and share it on her Facebook page, you have a chance to win a $10 gift card to her shop? At least one winner will be chosen every month, so don't be shy - share!

Thanks for stopping by! 

Saturday, August 27, 2016

Go Fish!


Timing was perfect for me to make a masculine birthday card that fit with the Simon Says Stamp Monday Challenge.

I used the Tim Holtz Rays texture fade to emboss the background which I inked slightly to highlight the embossing. Over that I layered a piece of acetate which I alcohol-inked to look like water.


I added a few cuts from my Cricut for the fisherman, bass and cattails. I used a small piece of fishing line leading to the bass which I put on an Action Wobble. Mr. Bass looks like he's putting up a good fight when you wobble him!


I added just a little bling on the corners so it didn't get too flashy for an outdoorsy guy. Thanks for stopping by!