Thursday, December 7, 2017

Mini Winter Wonderland


This is a very quick post to show a project I made yesterday. It was 100% inspired by Richele Christensen's Winter Wonderland project which can be found here.

I still want to make the full-sized project at some point, but for now I've made a smaller, card-sized version using the same Tim Holtz Sizzix dies and some Chibitronics lights.  In my haste to create, I didn't think to take a picture of the circuit I set up, but it was a pretty easy one.  I used 3 white lights under some vellum to give it a bit of glow.  

And now I can't stop playing with the on/off  'switch' as it's so much fun to see this light up over and over again. I'm like a kid with a new toy!


I love this so much I'm not sure if I'll be giving it away or keeping it for myself. It's like my own personal version of a fidget spinner.  Lights on, lights off, lights on, lights off!  


One more picture from the side so you can see the pretty glitter that doesn't show up in the other shots.  

Thanks for stopping by!

Friday, December 1, 2017

Oh Christmas Trees!


I'm sure that just about everybody making one of these Heirloom Christmas Trees from SVGCuts has a memory of one of the ceramic Christmas in their home when they were growing up.  My grandmother made some of the most amazing ceramics projects and we had a beautiful ceramic tree with toys around the base that I can remember from 30+ years ago. I couldn't wait to make a paper version for myself!

I'll try to keep this post relatively short, but include some details on what I did differently.  I really like the idea of a tree trunk for the base, so I used an inked embossing folder to run the base panels through my Cuttlebug.  I used some lightly glittered green cardstock for the tree which adds a pretty sparkle, and popped on some red bird bulbs in place of clear to add to the woodland character I was going for. 


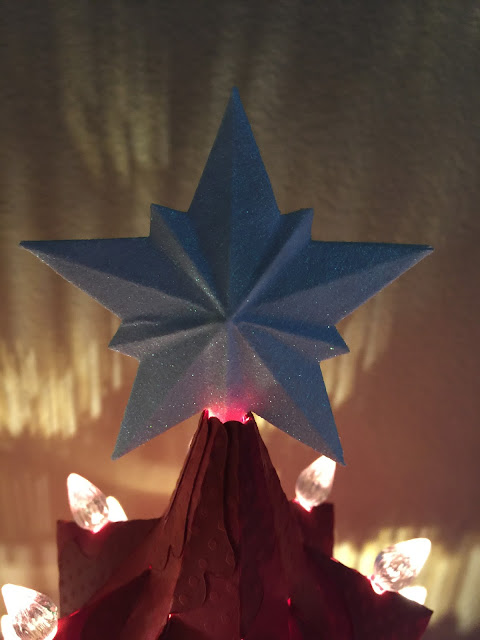
I really wanted my star to have a little glow to it, but was planning on using the candle lamp as my light source, so had to get creative with how I'd throw some light out the top. I added vellum to the backside of both of the star pieces and inserted a tiny little piece, probably only about 1/4" long from a drinking straw in the hopes that some light would carry upwards.  It worked! It's not terribly bright, but it does give the star a nice glow I think.


Next up, a red tree for a family member who just adores the color red.  I think she's going to love it!


I made a a white glitter star using Tim Holt's Dimensional Stars thinlit die. I cut out two of them and glued them back to back to get one very dimensional star.


After making the trees, I kept thinking about adding some toys under them to mimic the tree my grandmother made so many years ago. Then an idea hit.  

I couldn't have a tree without a train!


Yes, it's a real working train and a relatively inexpensive one at that!  I found this Westminster Train in a Tin on Amazon and had to give it a try. It's remarkably powerful for a little battery-operated train. I was holding off on this blog post until my train arrived and once it did, I realized that the track wouldn't go over the cord from the candle lamp! So I built a little tunnel that I could lay the cord over top of and the train goes right underneath. It was a quick little project that I didn't even use my cutting machine to do. I'll definitely be dressing it up at some point, but it's good enough for now. I was in a hurry to test out my train!


I have one or two more trees to make, but now that I've done a few, they should go together pretty quickly.  

Thanks for stopping by!

Friday, November 17, 2017

It's Christmas-TIME!


And how do I know it's Christmastime?  Because I have a Christmas clock of course!

This super adorable Gingerbread House Clock file is from the Bird's SVGs Christmastime collection.  Here's a picture of the whole collection - fabulous, right? 


I chose to make mine with red accents but could really picture this in a number of different colors.  


I changed mine a little bit by adding a gingerbread snowflake to the face of my clock. This is a Cricut image from a cartridge called When It's Cold Outside. I sized it to 3.3 inches wide. I thought it was just perfect for the face of the clock. 

I also added a little peppermint candy (from Cricut Joys of the Season cartridge, cut at .75 inch wide) to the second hand of the clock, so as every second passes, the candy twirls a little bit.  


The hands that came with the clock mechanism were originally gold, but didn't show up very well against the gingerbread snowflake, so I coated them with some red Stickles and now they show up quite well and sparkle too!

And how could I forget...it's also a luminary! The whole house lights up if you add some LED tealights or a light strand inside.  I don't have a picture of mine lit up yet, but here's the picture from Bird's website. So great!


You may have noticed the pretty little white Christmas tree sitting beside my house. This was created using the FREE Swirly Christmas Trees file which is also from Bird. 


I sized mine to 7 inches tall and cut out six of them on my Cricut. Then I scored them down the center, folder them in half and glued them together to make the 3-dimensional tree.  This was originally Bird's idea, but mine is smaller than her original tree.  

Of course the Snowflake Christmas Tree in the Christmastime collection would look great with this project too. I've just been wanting to try my hand at one of the swirly trees and I think the swirls in it match the icing swirls on the clock so nicely.  

Last but certainly not least, I made the cute little Gingerbread House Card which is also from the Christmastime collection.  


I have family members who are locally famous for their annual gingerbread creations. A picture of their project always seems to end up in the newspaper every year. This is the perfect Christmas card to send to them. I just happen to have an appropriate rubber stamp sentiment for the inside too:


Whew, long post, but hopefully you enjoyed it if you've read this far!

Thanks for stopping by and be sure to check out this collection from Bird's SVGs. It's a really neat one. I loved being able to build my own special seasonal clock and it was so easy! 

Wednesday, November 1, 2017

The Beauty of Fall Colors


I think this new project has made it to my top five favorites of all time!  I grew up in New England where colorful fall foliage is a treat for the eyes this time of year. Combining those wonderful autumn colors with some copper foil and lights just makes me happy.  


This was a bit of a hybrid project as I used svg files from three different sources to create this lovely shadowbox:

1.  Large Square Shadowbox Frame from Bird's SVGs Picture Perfect Collection
2.  Falling Leaves Paper Sculpture from Dreaming Tree's Autumn Calling Bundle
3.  The Beauty of Fall Colors, a free download from Love SVG

I created the white shadowbox frame using the size it was designed to be - 11" square. I did not use the acetate on the front to close up the shadowbox, but you certainly could. I love being able to make my own shadowbox frame whenever I want. It's easy to customize and Bird designed it in a way that's very easy to put together.

I sized the Falling Leaves border to be 8.8" wide so it would fit inside of my frame. The leaves were all sized down at the same time.  Some of these leaves were cut from patterned paper, some were run through my Cuttlebug with an embossing folder and some were just inked using Tim Holtz Distress Inks.  I cut one extra layer of the border to use for lighting - I'll explain below.


The "Beauty" phrase was sized to 4.135" wide and cut from Cricut copper adhesive foil and transferred to the blue background layer. I also used a copper foil patterned cardstock for the front panel of the shadowbox frame, although it's hard to photograph the fantastic shine of it.  Here's a closeup where you can see it better:


Last but not least, I added a 5-foot long string of LED lights (I purchased these on Amazon) and sandwiched them between the layers of the leaf border. Because the lights are on a flexible wire strand, I bent them and taped them down near the tips of all of the leaves.  I added foam dots all over the top of that layer and added the finished leaf layer on top of it.  The sandwich from bottom to top goes like this:

1.  blue bottom layer

2.  double thick red border layer attached to blue layer with foam dots/tape for dimension
3.  light strand taped down to top of layer 2
4.  red border layer with decorative leaves attached over layer 2/lights using foam dots/tape

Prior to the layering, I decided where I wanted to mount the battery pack on the back of the frame and then punched a hole through the frame as well as layers 1 & 2 so I could thread my lights in though the back.  I wish I had taken a few pictures when working on it, but didn't think of it until after everything was already stuck down.  


If I've missed a step or you'd like a more detailed explanation, let me know and I'll try to help. It's really not hard, just a little time consuming. I think the end result is well worth it though!


Thanks for stopping by to check it out!  I'd love to hear what you think.  

Monday, October 16, 2017

Wonder Women!


I've been a Wonder Woman fan since I was a little girl. I was so excited when I heard she was finally getting her own movie. I was counting down the years, then months and days until I could see it on the big screen!  I was not disappointed. This has become my favorite movie.  If you haven't seen it, you really should!  

I've had this Bustier Purse svg file from Cre8ive Cuts for a while, and finally decided to make it, but with a twist - Wonder Woman style!

I really didn't change all that much from the original file. I omitted the strap/handle, and added some white stars and yellow/gold trim. Rather than ribbon, I used gold cord for the lacing as a nod to Wonder Woman's golden lasso.  

The little piece in the middle is something I fabricated myself, but it's little more than a diamond shape welded to a hexagon and very easy to re-create.

I have this sitting on the desk in my office as a daily reminder that all women are wonder women!  It's an uplifting (as a bustier should be!) message on the days that don't feel so wonderful.  

That's it for today - just a short, quick post. Thanks for stopping by and and remember, 

Sunday, October 8, 2017

Spinning Spider Card


I chose to keep this fun kinetic card rather simple. I didn't add a ton of bling because I really wanted the spinning of the spider to take center stage.  

This card is from the Fantasy Foals collection from Bird's SVGs and originally contained a sparkly spinning unicorn. I went with some rather bright and bold Halloween colors, black glitter cardstock and a spider in place of the unicorn. 

The spider I used is from the Spider Venom collection which is also from Bird's SVGs, but you could substitute any spider or crawly critter you desire! 

This is my first time uploading a video clip to my blog, so if it works, fantastic! If not, I'm sorry and I'll try to figure out what I did wrong. Fingers crossed that you can see the fantastic spinning action!  


On the back of the card, I added this EEK sentiment which came from Cricut Design Space. The font really seemed to perfectly match the style of the card.  


I added another spider cutout to the envelope flap as you can see pictured here:


And here's a tip for the envelope. It is not my original idea, but definitely one worth sharing. When I'm making a cardstock envelope that I know won't be used for mailing purposes, I add a Velcro dot as the closure.  This way, the envelope doesn't become too tattered, and the card can be stored in the envelope and taken out time and again to play with. You just know that a fun kinetic card is going to be handled a lot!


There are so many fun, fluttery things you could use in place of a spider. For Halloween I think a bat or ghost would look fantastic too. The possibilities are really endless. What ideas do you have for a fun spinner - I'd love to hear!

Thanks for stopping by!

Saturday, October 7, 2017

Creepy Coffin Luminary


I just loving making Halloween crafts, and I was super excited to see this creepy coffin luminary released by Bird's SVGs. It's from the new Creak 'n' Shriek collection

Creak 'n' Shriek Collection from Bird's SVGs
If you've read my blog before, you probably know how I adore things that light up, so naturally this was the first project in the collection that I just had to create. 

Not only does this project go together very easily, Bird's assembly tutorial has several helpful tips along the way, including one suggestion for avoiding wrinkly vellum on such a large piece.  Honestly, I love listening to both Bird's accent and her handy tips and therefore watch all of her videos even if I have a pretty good idea how things go together!

I followed Bird's suggestion and used some antique gold Rub and Buff wax to highlight my pieces and it really has a fantastic effect.  You can see it much better in this picture. I love the worn, vintage look this added to the piece.


On the base of the luminary, I added some dried Spanish moss to make it look like this crypt was a bit overgrown. I used some antique gold brads to the RIP plaque.


Last but not least I decided that a black rose with some gold wax highlights was the perfect finishing touch.


I've really been enjoying looking at my creepy coffin luminary every night.  It's just so cool!


Be sure to check out the full collection from Bird's SVGs - there are several amazing projects for Halloween.  I think the pop-up bat card might be next on my list.

Thanks for stopping by! I'd love to hear what you think. 

Thursday, September 21, 2017

Party in a box!


We have a family member who is coming up on her 100th birthday in the next few months and I knew I needed to make a very special 'card' to celebrate this momentous occasion. The Explosion Box from the It's Your Birthday bundle by Dreaming Tree immediately came to mind.  

I started with the recipient's favorite color, bright red, and began by building the outer panels of the box with it's white glittery ribbon. It looks so festive! 

Next, I had an absolute blast decorating each panel on the inside - I'll take you through each one. I used svg files from a few different places as well as some die cuts, but the majority of the project is the file from Dreaming Tree.


First are my favorites of the whole project - the sequin filled shaker balloons!  I modified the balloon file in Cricut Design Space to create a cutout in the middle of the balloon. I cut out five layers for each balloon and glued them together to create the pocket for the sequins. 


The addition of so many sequins to each of these panels definitely weighs down the flaps, but I just love them so much! I used white vinyl on the front of the acetate to add the "100!" to each balloon.

On the triangular inner flaps, I started by adding this cute little party monkey from Cricut. The recipient loves monkeys, so this was a definite must have. I embellished with some more sequins and tiny confetti which was cut out using the Cuttlebug Celebration Confetti die. 


I added a cute little girl party bear too, also from Cricut, and dyed her tiny hat pompom to match with some Tim Holtz Twisted Citron re-inker. 


Next up, I added a party hat which looks just like the big one in the center of the box:


I wanted to have a Happy Birthday message of some sort, and found the perfect thing in a free pennant file from Bird's SVGs.  I sized the pennant to fit the flap and blinged it out with some gems across the top.


Last but not least, I also wanted to have a place to sign the card and add a sentiment. I used a cupcake card from Cricut's  Sweet Treats cartridge which I sized down to fit. I stamped a sentiment inside the card, signed it and attached it to the flap.  


Here's the final version one more time:


I'm really so pleased with how this all came together. The colors and shaker elements make this feel like a party in a box to me. Now I just have to wait a month or so before I give it to the recipient - can't wait!  I think she's going to love it too.

Thanks for stopping by! 

Monday, July 24, 2017

SHARK!!!


Have you seen the new Jawsome collection from Bird's SVGs?  It is so much fun!!  


For some reason, I couldn't stop thinking about how I could use these cards for Christmas.
Before the collection was even released, I was making a list (and checking it twice) of puns and sayings I could use with this fabulous fish.  

Here's the first one:


and when you open it up, you get the singing shark wearing a Santa hat on his dorsal fin for the holidays! 


I laugh every time I look at it!

Next up, I turned this guy's frown upside down and gave him a Santa hat too. I also thought it might be fun to put a candy cane in his teeth - I just tucked one in there for now, but might make it double sided before I secure it onto the card because you can see it from the inside too!


On the inside:


Searching online, I found a graphic with a hilarious little edit of the Santa Claus is Coming to Town lyrics. I'm thinking about sticking it on the inside cover of the Santa Jaws card. It goes:

I see when you're swimming,
below you and your wake.
I know if you taste bad or good
so beware for goodness sake!

What do you think - should I add that, or is it too creepy for Christmas?

I created the alternate sentiments myself using fonts Milkshake and Arial Black. I jazzed up the colored words with one of my new favorite products - Wink of Stella in clear. It adds a lovely shimmer to any project and I find I'm putting it on almost everything I make!
It's hard to photograph, but you can kind of see it in this picture on the red SHARK letters.


Since I made a list already, I thought I'd share a few more Christmas puns to go with this Jawsome collection:

~ May your days be merry and bite
~ Sea-cret Santa
~ We fish you a merry Christmas
~ Season's Eatings


I sure had a lot of fun making these cards and the pop-up shark was very easy to put together if you watch Bird's assembly video.  I can't wait for an excuse to make them with the original sentiments. I love the Happy Birthday tag with the bite out of the corner - so funny and clever!

Thanks for stopping by. I hope you have a fin-tastic day!