Saturday, December 31, 2016

12 Tags of 2016: December Edition


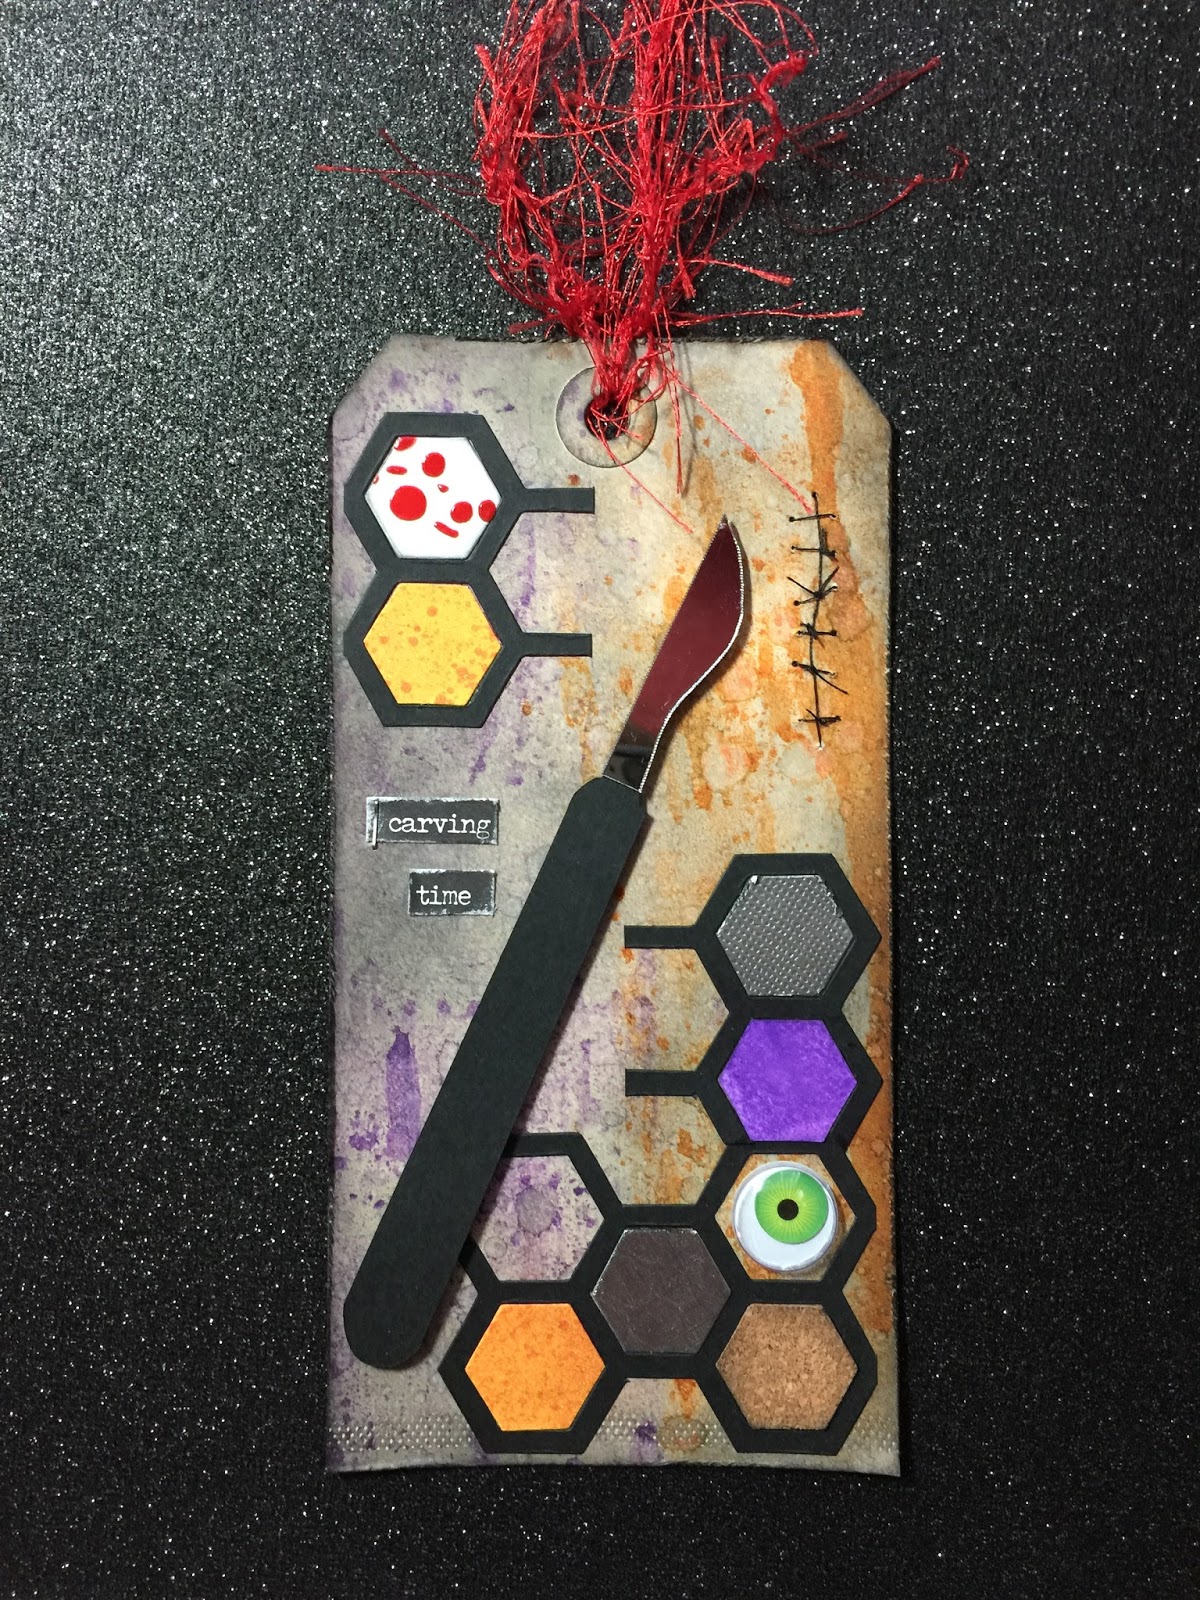
As usual, I've cut it right down to the wire getting my tag done for this month, but I did spend a lot of time thinking about it. The ideas all fell into place a few days ago. As Christmas has now passed, I used the upcoming new year as my inspiration.

I wanted to use brushed pewter stain, but wasn't sure how that would show up on the burlap, so I opted for a piece of the textile surfaces linen instead and used the Nordic stencil. I really like the subtle shimmer of the pewter stain on the linen. I distress the edges a bit and inked with stormy sky and chipped sapphire ink around the edges. 


I continued to use silver throughout the tag, including silver embossing powder on the 'go see do' shadowpress, used some silver metallic ribbon trimmings behind the shadowpress panels and obviously the snowflakes and gears are all cut out in silver as well.  I actually added some metallic mixative alcohol ink to the arrow to make it more silvery.

The arrow on the calender tile piece is symbolic of the start of a new year, as well as the ball dropping in Time's Square on New Years Eve. I used alcohol ink to tint a gumdrop a lovely aqua color (a favorite color of mine) and added it to a few layered mini snowflakes to represent the infamous ball. I added some mercury glass Stickles to add a little bling reminiscent of the sparkling ball as well.


The snowflakes (mini paper snowflakes thinlit) and gears (gearhead thinlit) represent the transition from the holiday season into the new year and time to get back to work and busy with new endeavors. 

The snowflake with the hope token and mirrored star is a tribute to Carrie Fisher. I've been a huge fan of Star Wars since I was a child and have lived long enough to have seen every single film in the theater. It was a sad and sentimental day when I saw Rogue One the day after her passing. Anyone who has seen the film will understand why I chose the message of hope to represent her.  

The clock and 17 number brad represent the passage of time into the new year, 2017. The 17 was filled in using picket fence distress crayon. I mounted it on a square of green Nordic print from the Tidings paper collection and edged it with some stormy sky and chipped sapphire ink before deciding to add some rock candy glitter too. Love the icy sparkle this adds. 

Last, I used some brushed pewter stain over the 'auld lang syne' chit chat sticker and attached it with the mini attacher to a remnant piece of navy cardstock. 

Thanks so much for stopping by to check out my tag and last blog post of the year. I can't wait to see what 2017 brings! Go. See. Do. 

Wishing you all a very happy new year!

Friday, December 9, 2016

Tis the Season


The holiday season is upon us, and as with most, I've been busy working on projects, Christmas shopping and a whole list of other things I never seem to get ahead of! In fact, I made this fun tree luminary weeks ago and am only now getting around to posting it.

This project from Bird's SVGs comes from the Home for Christmas collection (shown below) and is a fun way to create some glowing home decor for the holiday season. The paper is used is printed with colorful pom poms and I added some sequins here and there for some extra sparkle.


What is so neat about this tree is that Bird designed it in three different sizes, so you can create a forest, or pick just one to fit in where you'd like it. I made the largest version of the tree and it's large enough that it will fit an LED pillar candle inside. I opted to use a color-changing electronic tea light as it seemed to go well with the colorful paper. I must confess that I've been thinking about doing some gold and silver trees, maybe using glitter paper. The possibilities really are endless. Now all I need is an extra week in December and I should be all set!


Something I plan to make a bunch of are the cupcake boxes from Bird's Celebrate with a Cupcake collection


 Every year I tend to load up on fun chocolates and other sweet treats and give away little bags or boxes of them to friends and family. The individual cupcake box is perfect for this!


I eliminated the insert which would hold your cupcake in place, and I replaced the cupcake embellishment on the front with a little bonbon I found in Cricut Design Space. The box holds quite a bit of candy and I love the look of the top when it's all folded up...I think it looks like a swirl of icing on top of the box!


This is a very quick and easy little box to assemble, and will come in handy for lots of little gifts and treats this year. 

Last but not least, since I'm jumping all over the place with projects I thought I'd mention this lovely bag from Bird's For My Mum collection


I made this bag shortly after the collection was released, but only had this one picture of it before I added the ribbon handle and gave it away. 


I just recently stumbled across this photo and started thinking how lovely this bag might look with a poinsettia on the front for holiday gift giving. Red on white maybe. White on pink? Your imagination is the limit.

As always, thanks for stopping by and I hope your holidays are a joy!

Friday, November 4, 2016

Turkey Lurkey


With Thanksgiving just under three weeks away, I've been thinking about some holiday decor. Once the Halloween stuff is put away, I like to decorate with autumn themes in preparation for Thanksgiving. I know some have moved on to Christmas decorating already, but I really like to enjoy the fall season as long as I can before breaking out the red and green!

I've had this little turkey in my head ever since Bird released the Autumn Leaves kit which you can find here in the Bird's SVGs store. It's loaded with beautiful projects and I fell in love with the Maple Leaf Bunting right off the bat. 


About five years ago, Tim Holtz made some adorable Quirky Turkeys using his rosette dies. I thought they were so cute and made some straightaway. Bird's lovely maple leaf had me reinventing that little turkey in my head!

Turkey Lurkey only stands about 3.5" tall and is maybe 5" wide. I used the maple leaf in the Extras folder because it doesn't have a hole in it for stringing. I sized the leaves to the following widths:

     small yellow:           4.72" wide
     medium orange:     5.72" wide 
     large red:                6.72" wide 

Before assembling the leaves, I did some inking on the edges and down the centers to add a bit of gradient, but I probably would have had better results if I started with some lighter colored papers. In the picture below, you can see some of the green in the center of the yellow leaf, but it was mostly covered up when I added the turkey body. I'll bet this would look so cool with some seasonal printed papers as well.


Because the leaves are much smaller than if you made them into a bunting, I used some craft tweezers to help me pinch the pieces together when gluing as I couldn't really fit my fingers in there very well.  

Once all the leaves were pleated and glued, I stuck them together with some 3d sticky dots to space them out a little bit and add even more dimension. You can see them a little bit from this side view:


Then just to make sure they stayed together and also to add a little bit of a base, I hot glued the cluster of leaves to a 1.25" circle that I had leftover from another project. The color doesn't matter as you can't see it from above. View from the bottom:


Last but not least, I added a cute turkey body from the Cricut Create a Critter cartridge. I sized him to be 2.5" high. He was stuck to the front of the leaves with another 3d sticky dot.
Bird also has a very cute turkey in her free Thanksgiving bundle that would work as well. I just fell for the top hat!


I can picture Turkey Lurkey on the dining table as part of the table setting. If you replace the turkey body with a circle or other shape, you could write guest names on it and use it as a place card too. By using larger sized leaves, I think you could even make a turkey centerpiece!  

Well I'm glad to have gotten Turkey Lurkey out of my brain and into a project. I'd love to hear what you think in a comment below. Also, be sure to post a picture on Bird's facebook page if you make any of her projects. Every month somebody wins a $10 gift card to Bird's SVGs shop just by sharing.

See you next time and thanks for stopping by!  

Sunday, October 30, 2016

12 Tags of 2016: October Edition


Well, I can't believe it's been over a month since my last post! I had some deadlines to meet and hopefully can get back to some normal posting again. 

I'm glad I was able to spend some time getting my tag done today, because I was thinking about all week. I didn't have any of the monster dies like Tim used - see Tim's original post here - so I jumped straight to Christmas and was able to use all of the same techniques.

I used some paper from Tim's Tidings holiday stack and cut it up into little bits of ephemera for collaging with. 

I covered my finished patchwork with crazing collage medium, let it dry and added some hickory smoke crayon around all of the edges.


This picture shows a close up of the wonderful cracks that the crazing medium creates when dry. It reminds me of old porcelain.  This picture also shows the little pincone adornment I added to the ribbon. Before I added it, I dabbed it lightly with some glossy accents and dipped it in vintage platinum distress glitter dust. It's hard to see in the photo, but really adds some lovely sparkle.

I also used my spatter brush to add some white paint/snow to the surface once all of the crayon had been added and worked into the crazing.

I think the tattered poinsettia die with coordinating texture fade came out so cool when cut from adhesive foil stuck to cardstock.  I used the same technique Tim did for painting and then wiping away, but more color stayed in the debossed area as it's hard to wipe it away from all the nooks and crannies. I love how the colors came out.  

Once the paint dried, I did add a little crayon on the poinsettia as well, just to add some shading. I also added some distress glitter in mustard seed as the poinsettia center. 


Thanks for stopping by to check it out!

Thursday, September 22, 2016

Acorn Shaker Card


Happy first day of Fall!  This is my favorite season of the year and I had to celebrate with this fun acorn shaker card.  Or as I like to think of it in my head, a shake-orn!  

When I saw the adorable acorn shaker placecard in the new Autumn Leaves kit from Bird's SVGs, I just knew I had to make it. What's better than sequins and celebrating the colors of Fall?

Autumn Leaves from Bird's SVGs

I decided to make this into a full-sized card by enlarging the shaker pieces in my Cricut software. The acetate piece is 3.88" in height if you want specifics. 

I also decided to pull out some of my rubber stamps to add a sentiment and a few autumn flourishes. Before I glued the acorn walls to the card front, I strategically stamped and embossed with gold embossing powder a Happy Fall message that would go inside the acorn.  


Because I wanted to make sure the message was visible, I didn't add as many sequins as I normally would for a shaker, but I think it's still enough to add some fun movement to the card. I went with browns and golds for the acorn cap, and a mix of some yellow, orange, red and gold leaves for the bottom of the acorn. 

These colors remind me so much of the seasonal changing of the leaves. I used a piece of brown glitter card stock as the card base which adds an extra layer of sparkle.  

With this acorn being eight layers thick, there were a bunch of leftover acorn caps and bottoms when all was said and done. 


Using some Distress inks and an embossing folder, I added some color to the leftover pieces and built myself some more acorns which I can use on other projects, cards or even as little gift tags!  


Bird generously offers her new kits at a discount during the first week of sale, so be sure to check out the the Autumn Leaves kit in the next few days to enjoy the special!

Did you know that if you make one of Bird's projects and share it on her Facebook page, you have a chance to win a $10 gift card to her shop? At least one winner will be chosen every month, so don't be shy - share!

Thanks for stopping by! 

Saturday, August 27, 2016

Go Fish!


Timing was perfect for me to make a masculine birthday card that fit with the Simon Says Stamp Monday Challenge.

I used the Tim Holtz Rays texture fade to emboss the background which I inked slightly to highlight the embossing. Over that I layered a piece of acetate which I alcohol-inked to look like water.


I added a few cuts from my Cricut for the fisherman, bass and cattails. I used a small piece of fishing line leading to the bass which I put on an Action Wobble. Mr. Bass looks like he's putting up a good fight when you wobble him!


I added just a little bling on the corners so it didn't get too flashy for an outdoorsy guy. Thanks for stopping by!

Friday, August 26, 2016

Not so white Christmas!

I was eagerly anticipating the release of the White Christmas collection from Bird's SVGs as I just fell in love with the preview photos and all of the layering and different types of cardstock used in the projects. 

White Christmas from Bird's SVGs
I started sifting through my stash looking for some nice pearl, glitter and mirror cardstock to create my own version of the lovely poinsettia card. I've recently been admiring some beautiful Christmas trees and decorations done in brown, green and teal. As I had some of those colors in my supply, my project went from white Christmas to peacock colors in the blink of an eye!


My love of paper might be matched by my love for glitter and shimmer in crafting. I'm still undecided if I went overboard on the glitter here, but I figure if you can't go all out glitzy for Christmas then you never can!

The base of the card is a cream pearl layered with brown glitter and a brushed gold for the lacy layer around the oval. The teal colors are from glitter, foil (as seen in the leaf veins) and plain cardstock. Here's a picture at a slight angle so you can see the shimmer from the foil on the teal leaves.


The berries and center of the poinsettia are cut from gold glitter and the poinsettia itself is the same brown glitter cardstock used in the background. I edged the brown poinsettia leaves in gold so the layers would stand out as they are dark in color and the shadows from the layering didn't show up as much as I wanted them to. This also ties in the gold berries and center piece.

One of my favorite things about this card is the dimension from layering. This isn't the best photo, but you get the idea. Layers of goodness here! 


In the process of auditioning papers for this project, I made a second poinsettia from a patterned gold glitter paper. It obviously didn't end up this card, but it might just go on another one! Other ways to use this poinsettia might be as an ornament for a Christmas tree, a lovely addition to a bow on top of a gift, or maybe even with a pin glued to the back so it can be worn as a piece of jewelry over the holidays. 


So be sure to check out all of the wonderful holiday projects at Bird's SVGs, many of which are completely free. I made this card from the Let It Snow collection last year. There are lots of lovely designs to choose from.


Happy weekend and thanks for stopping by!

Saturday, August 20, 2016

Pumpkin Prize Ribbon

It seems like once the 4th of July has passed us by (here in the US anyway), all seasonal crafting takes a swift turn towards Halloween, Thanksgiving and Christmas. 


Every year my employer holds a pumpkin carving contest for the employees. I usually volunteer to make the prize ribbons and this year is no different.  What is different, however, is the really cool ribbon design I'm going to be using. 

Check out this ribbon from Bird's SVGs Simply the Best Card Collection that I'll be using as the base for this years' design. I made the ribbon only and not the card that goes along with it. 

Simply The Best SVG Card Collection
The scary pumpkin head is from one of Bird's many FREE collections and is called Halloween Characters. I wanted to make him look like he was lit up, so I cut a plain back panel in yellow cardstock and then mounted the front orange face piece with some foam tape to add some dimension. 

There are many different ways to create the solid back panel like I did here, it really just depends on what software you are using. I use a Cricut and I found it easiest in Cricut Design Space to simply duplicate the design and then use the contour function to hide the facial features on one of the pieces.

I'm still fiddling around with the colors a little bit. I think I might go with a bit of a deeper purple to match the lovely purple Stickles I used around the center.

While in Halloween mode, I also downloaded Bird's FREE Haunted House Card & Bag file. I enlarged the file so the house measures about 8 inches tall and 7.25 inches at it's widest point. I used some yellow vellum for the windows and added some battery-operated lights inside so this haunted house is all ready to glow through the spooky season!


If this post has gotten you in the mood to do a little bit of holiday creating, be sure to check out Bird's SVGs for some really great inspiration. I just love this bag from the Spider Venom Collection!


And if you visit Bird's Facebook page right now, you can enter for your chance to win her brand new White Christmas Collection which is being released very soon. 

Good luck and thanks for stopping by!

Monday, August 15, 2016

12 Tags of 2016: August Edition

Honestly, I'm not sure what got into me with this tag. I'm not into bloody and gory Halloween stuff. Horror movies are NOT on my must-see list of films! For some reason though, my tag for August took a creepy turn.  Tim's original tag can be found here.


Maybe it was the recent delivery at my doorstep of almost the entire idea-ology Halloween collection that had me thinking of the spooky season in the middle of August! Whatever it was, I sure had fun putting this tag together.

I used wilted violet and carved pumpkin for the brayered stain with some hickory smoke and black soot around the edges, and obviously the honeycomb framework for the shape.

During Creative Chemistry 103 I was experimenting with tinting the transparent gloss texture paste and created some blood spatter by adding some fired brick stain and then applying it through the Splatters layering stencil.


I had my experimental piece sitting on my desk and decided to whack it up and use it on the tag. Just like Tim said in class, you can always find a use for unloved results as background, die cuts, etc. Not that I didn't like the spatter result, it was just a really small experimental piece, so made a perfect tile in the framework.  

The orangish tiles are leftover pieces of a long ago experiment with Perfect Pearls sprays, so they have a bit of a sheen to them. Wilted violet was used to ink up a plain white tile and I also cut up some remnant silver and cork pieces to add to the mix. The big green googly eye is what started me down this creepy path.


I cut the scalpel out on my Cricut and added some Mirrored for the blade (cut by hand). I added some sutures on the right and the carving time chit chat stickers. I meant to use some more staples here and there with the mini attacher, but ran out and couldn't find my refill box. 

Last but not least I added some red fringy fibers as my ribbon as it kind of reminded me of blood spray. I know....so creepy! 

Anyway, I certainly tried something new with this particular tag and had a blast doing it. Thanks for stopping in to check it out.

Thursday, August 11, 2016

Football Marquee Sign


I had so much fun building this football marquee sign from the SVG Cuts Game Day Marquee Signs kit

I used some pigskin paper that I found at Hobby Lobby for the football, and therefore did not use the extra football panels for embossing since this paper is already textured.  


Since this is for personal use only, I added a "Steelers" cutout to the top panel. One thing that I found out after the fact is that NFL footballs don't have the white stripes on the ends. Unfortunately they were already glued down when I was informed of this, so my project might look a little mismatched to die-hard football fans, but I'm good with it and so is the recipient. And now I know for next time! Am I the only one who didn't know this?

I had some of the smoke-colored, faceted Heidi Swapp bulb caps in my stash, so I used those as they blend in really nicely with the black background paper when the lights are off. 


And when the lights are on, they're a little bit of a softer light and I love the effect from the facets.


I have a feeling I'll be making several more of these for Christmas for the sports fans in the family!  I got this one done just in time for tomorrow night's first pre-season game for the Steelers. I hope it brings them luck.            

Thanks for stopping by!

Sunday, July 31, 2016

Got Milk?


When I first saw the Bird's SVGs 'coming soon' message regarding the Nature's Bounty kit, I was truly excited to see a milk can in the collection. Over the past year or so, I've been trying to combine my love of both paper crafting and genealogy into some of my projects.  

My great-grandparents lived on a farm in Pennsylvania, and my great-grandfather Harry was a dairy manager. Unfortunately, my great-grandmother passed away at a very young age when my grandmother was barely four years old. One of the few pictures I have of my great-grandmother is this one with my grandmother as an infant, and a few milk cans in the background. 


Add in Harry's career as a dairy man (pictured on the right in the photo below) and you can see why I thought this project would be so much fun to incorporate into my family history projects/home decor.  Because this milk churn is also a box, I'm thinking it might be fun to put together a mini album with some of these photos which I can store inside the can.  That'll be a project for another day though.


Okay, family history lesson over!  I did an online search to get a feel for what vintage milk cans looked like and notice that many of them had raised/embossed lettering on the sides with the name of the dairy they came from.  I love that Harry's name rhymes with 'dairy,' so I decided to make that the name for the side of the can...Harry's Dairy!  The next trick was figuring out how to get the look of raised metal letters.  

I decided that I could cut the letters out of the same metallic paper I was using for the can and then just glue them on. I used Tim Holtz Alphanumeric Thinlets to cut the letters.


There are also a lot of photos of very rusted and distressed old milk cans, so before I added the letters, I scratched up and sanded the metallic cardstock panel pieces and then inked them all with some Distress ink in Walnut Stain.  


Once I was done making an inky mess of myself, I adhered the panels to the can and fell in love with the final results. I may have gotten a little bit carried away with the distressing in a few spots, but overall, I just love how this turned out.  


Thanks to Bird's wonderful design, I was able to put it all together in just an hour or two which included everything from the time I fired up my Cricut until I was taking pictures of the finished project.   

There are a few days left for you to get the Nature's Bounty kit from Bird's SVGs while it is still on special - a great deal with so many fun projects. 

You can find it here:  Nature's Bounty SVG Collection


And here's one more look at my finished project:


Thanks for stopping by!  I'd love to hear what you think of my vintage milk can in a comment below.