Showing posts with label Birds SVGs. Show all posts

Thursday, September 21, 2017

Party in a box!


We have a family member who is coming up on her 100th birthday in the next few months and I knew I needed to make a very special 'card' to celebrate this momentous occasion. The Explosion Box from the It's Your Birthday bundle by Dreaming Tree immediately came to mind.  

I started with the recipient's favorite color, bright red, and began by building the outer panels of the box with it's white glittery ribbon. It looks so festive! 

Next, I had an absolute blast decorating each panel on the inside - I'll take you through each one. I used svg files from a few different places as well as some die cuts, but the majority of the project is the file from Dreaming Tree.


First are my favorites of the whole project - the sequin filled shaker balloons!  I modified the balloon file in Cricut Design Space to create a cutout in the middle of the balloon. I cut out five layers for each balloon and glued them together to create the pocket for the sequins. 


The addition of so many sequins to each of these panels definitely weighs down the flaps, but I just love them so much! I used white vinyl on the front of the acetate to add the "100!" to each balloon.

On the triangular inner flaps, I started by adding this cute little party monkey from Cricut. The recipient loves monkeys, so this was a definite must have. I embellished with some more sequins and tiny confetti which was cut out using the Cuttlebug Celebration Confetti die. 


I added a cute little girl party bear too, also from Cricut, and dyed her tiny hat pompom to match with some Tim Holtz Twisted Citron re-inker. 


Next up, I added a party hat which looks just like the big one in the center of the box:


I wanted to have a Happy Birthday message of some sort, and found the perfect thing in a free pennant file from Bird's SVGs.  I sized the pennant to fit the flap and blinged it out with some gems across the top.


Last but not least, I also wanted to have a place to sign the card and add a sentiment. I used a cupcake card from Cricut's  Sweet Treats cartridge which I sized down to fit. I stamped a sentiment inside the card, signed it and attached it to the flap.  


Here's the final version one more time:


I'm really so pleased with how this all came together. The colors and shaker elements make this feel like a party in a box to me. Now I just have to wait a month or so before I give it to the recipient - can't wait!  I think she's going to love it too.

Thanks for stopping by! 

Friday, November 4, 2016

Turkey Lurkey


With Thanksgiving just under three weeks away, I've been thinking about some holiday decor. Once the Halloween stuff is put away, I like to decorate with autumn themes in preparation for Thanksgiving. I know some have moved on to Christmas decorating already, but I really like to enjoy the fall season as long as I can before breaking out the red and green!

I've had this little turkey in my head ever since Bird released the Autumn Leaves kit which you can find here in the Bird's SVGs store. It's loaded with beautiful projects and I fell in love with the Maple Leaf Bunting right off the bat. 


About five years ago, Tim Holtz made some adorable Quirky Turkeys using his rosette dies. I thought they were so cute and made some straightaway. Bird's lovely maple leaf had me reinventing that little turkey in my head!

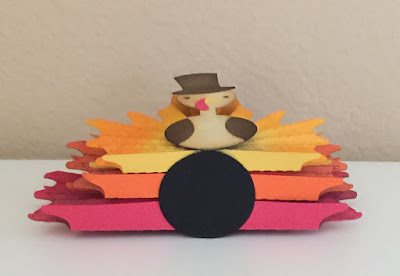
Turkey Lurkey only stands about 3.5" tall and is maybe 5" wide. I used the maple leaf in the Extras folder because it doesn't have a hole in it for stringing. I sized the leaves to the following widths:

     small yellow:           4.72" wide
     medium orange:     5.72" wide 
     large red:                6.72" wide 

Before assembling the leaves, I did some inking on the edges and down the centers to add a bit of gradient, but I probably would have had better results if I started with some lighter colored papers. In the picture below, you can see some of the green in the center of the yellow leaf, but it was mostly covered up when I added the turkey body. I'll bet this would look so cool with some seasonal printed papers as well.


Because the leaves are much smaller than if you made them into a bunting, I used some craft tweezers to help me pinch the pieces together when gluing as I couldn't really fit my fingers in there very well.  

Once all the leaves were pleated and glued, I stuck them together with some 3d sticky dots to space them out a little bit and add even more dimension. You can see them a little bit from this side view:


Then just to make sure they stayed together and also to add a little bit of a base, I hot glued the cluster of leaves to a 1.25" circle that I had leftover from another project. The color doesn't matter as you can't see it from above. View from the bottom:


Last but not least, I added a cute turkey body from the Cricut Create a Critter cartridge. I sized him to be 2.5" high. He was stuck to the front of the leaves with another 3d sticky dot.
Bird also has a very cute turkey in her free Thanksgiving bundle that would work as well. I just fell for the top hat!


I can picture Turkey Lurkey on the dining table as part of the table setting. If you replace the turkey body with a circle or other shape, you could write guest names on it and use it as a place card too. By using larger sized leaves, I think you could even make a turkey centerpiece!  

Well I'm glad to have gotten Turkey Lurkey out of my brain and into a project. I'd love to hear what you think in a comment below. Also, be sure to post a picture on Bird's facebook page if you make any of her projects. Every month somebody wins a $10 gift card to Bird's SVGs shop just by sharing.

See you next time and thanks for stopping by!