Showing posts with label svgcuts. Show all posts

Wednesday, December 23, 2020

Harry Christmas!

It's been a minute since last I posted, but I wanted to share the pictures from a project I recently completed. A friend requested a custom explosion box with a Harry Potter theme for her nine-year-old granddaughter. Things she wanted included were Hermione, Hedwig and Dobby. As a pretty big fan of the Harry Potter myself, I had a million ideas, definitely more than I could use in this single box! I kept in mind that the little girl receiving this has only seen a few of the movies and tried to narrow my options. 

This post is going to be mostly a lot of pictures and list of supplies used versus a detailed step-by-step or how-to. 

For the explosion box itself, I used the Gingerbread House Exploding Box SVG file from 

I created panels for the sides of the box using the Tim Holtz Sizzix Brickwork 3D Texture Fade. I ran a black inkpad over the folder before embossing which brought out some of the detail. The deer are from Tim Holtz Sizzix Darling Deer and Winter Wonderland die sets. With Harry's patronus being a stag, I thought the deer would be a fun touch and provide interest to the brick walls.  The Hogwarts title was cut on my Cricut using a free font called Harry P.  The stones and moss are from my stash. 


The centerpiece of the box interior is the Hogwarts Express. This was created using a few pieces of the Choo Choo Train SVG from Dreaming Tree's Christmas Cheer Bundle.  Some Polyfil was used to make a little wisp of smoke coming out the top. I glued the train in the upright position so it would not flop over when the box is opened. On the back side of the flap/wall, I added a Platform 9 3/4 image that I found online. 


The inside of the outer flaps were stenciled with the Tim Holtz Stampers Anonymous Falling Stars stencil and some gold ink before adding a house crest to each. The Hogwarts House Crests are a free svg file from Designs by Miss Mandee.  She has a bunch of great Harry Potter related svgs and I used several of them in my project. 


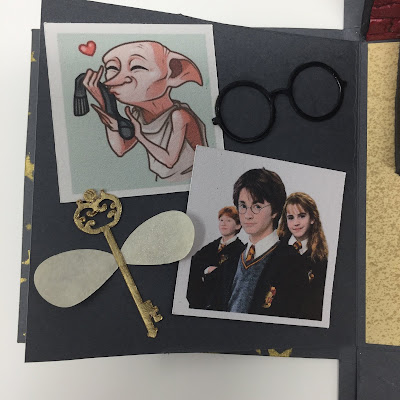
The flap to the left of the train includes a few printed pictures including Harry, Ron & Hermione as well as a cute illustration of Dobby. The flying key is from Miss Mandee and can be found here. I did alter the wings to be solid as this cut is very small and I didn't want to tear the wings trying to achieve lacy detail. I added some Perfect Pearls powder to the wings to add some shimmer. The eyeglasses I just created using a few circles.


I used a Tim Holtz Sizzix die called Santa's Helper to create the little stack of books, but this could easily be done by hand if you don't have the dies. The svg of Hedwig is another freebie from Miss Mandee and can be located here.  The wand was made by running a bead of hot glue around a toothpick and then painting it. The stars are a from a Tim Holtz Sizzix die called Swirling Stars. I also applied some glittery Stickles around the stars to up the magical feeling!


The envelope is one I found online as a free svg, although I don't recall where I found it. I sized it down to fit the flap and added the desired message for the recipient. I think that pretty much covers everything inside and out. 


I did add some extra pieces because I was having fun. I created this Snitch ornament using a glitter foam ball and gold wings cut out using some gold mirror cardstock and a Tim Holtz 3D Impresslit called Winged. 


I salvaged the hearts that I cut out of the inner box flaps and re-purposed them into a couple of ornaments as well. 


Last but not least I included a Howler card which I found on Miss Mandee's site. It was super easy to put together and so cute! 


Merry Christmas Muggles!!! 

Monday, May 14, 2018

Secret Garden


When I learned that a family member was going to be celebrating her 75th birthday, I set out to build her a special card to commemorate the occasion.  The card turned into an explosion box featuring her love of gardening, tea and all things vintage!  Her garden is so beautiful that it was featured in a magazine years ago.
I used a variety of svg files, dies and punches to create my project.  I started by using the Easter Explosion Box from Dreaming Tree as the base.  I only used the main body and lid along with the panels to go on them.  I cut the panels from glittery hydrangea paper from K & Company which I've had in my stash for many, many years. The garden is bordered by huge hydrangea bushes and so I wanted to include some in the project.  The tag is cut from a Tim Holtz die and the butterfly is from a layered punch by Martha Stewart.  I embellished the butterfly with some Liquid Pearls by Ranger.


I also wanted to include a dramatic flower on top of the box instead of using a bow.  I've been wanting to make the peony from Dreaming Tree's Love You Mom collection, so I Googled it to make sure that blue peonies actually exist and they do - they're quite beautiful!


Next came the inside where I went with a completely different color scheme than on the outside.  Here's a bird's eye view with the lid removed:


The centerpiece for inside the box is this rose-filled teacup; the svg files for the cup, saucer and spoon are from the SVGCuts Tea For You & Me kit.


I cut the small rolled roses out of three different shades of pink cardstock using a Sizzix die. I added a floral foam block inside the teacup, glued some Spanish moss over top of it and then hot glued the roses on top of that. I added the tea tag which I created from a scrap of Tim Holtz paper and some numeric rubber stamps.


The doily underneath the tea cup is a Tim Holtz die. I added an extra rose and a little greenery leftover from another project, also from a Tim die.  It's hard to see in the picture, but I wrapped a thin gold washi tape around the base of the tea cup to match the gold handle and gold foil in the paper print on the outside of the cup. I embossed the very end of the spoon and added a little pearl to embellish.


I originally wanted to make some offset flaps on the corners so that it looked sort of like a lacy napkin underneath the tea cup. I converted these beautiful lace banner pennants from Bird's SVGs Tea Party collection by adding a tab to the top of the banner for gluing into the box.  Unfortunately I didn't take the width of the saucer into consideration when designing the project and when I tried to add the flaps at the corners, the wouldn't fold up properly.  I didn't want to waste them, so I just used them in alignment with the outer flaps, although I would have made them larger if that was my original plan.


I embellished each flap with a pearl and a piece of Tim Holtz ephemera that matched the project.


For the outer flaps, I used a pink and purple, lightly glittered piece of K & Company paper for the panels and edged each panel with a strip of lace cut with a Tim Holtz die.  I added some white liquid pearls along the edges as well.


On each outer panel I added more ephemera, mostly from Tim Holtz, as well as some Chit Chat stickers, also from Tim.  


On the last panel, I cut out a little envelope and tucked in a tiny card that I stamped with a Happy Birthday sentiment, added a ribbon pull tag, signed the back and added a little velcro dot to close.


Oh, and I forgot to mention the butterflies on the inside!  They are all from Martha Stewart punches. The larger ones were glued to some acetate strips which I glued to the base, so when the box explodes open, the butterflies flutter around a bit.  I cut the base layer of the butterfly with leftover patterned paper and the top layer was cut using vellum.  I added some liquid pearls to these too.  


I packed this up and put it in the mail last week. The recipient absolutely loved it! I'm so glad because it was quite a bit of work, although I enjoyed every minute of planning and executing it so it would turn out how I envisioned.  

Every project leaves me with a list of things I'd change, do better or remember to include next time. I think that's part of what makes it fun and helps us grow artistically.  I really enjoyed being able to mesh many different svgs, dies and other supplies into one cohesive project.

Well that was a long post, so thanks for hanging in there if you've made it this far. I appreciate you taking the time. Thanks so much for stopping by!  Until next time...

Friday, December 1, 2017

Oh Christmas Trees!


I'm sure that just about everybody making one of these Heirloom Christmas Trees from SVGCuts has a memory of one of the ceramic Christmas in their home when they were growing up.  My grandmother made some of the most amazing ceramics projects and we had a beautiful ceramic tree with toys around the base that I can remember from 30+ years ago. I couldn't wait to make a paper version for myself!

I'll try to keep this post relatively short, but include some details on what I did differently.  I really like the idea of a tree trunk for the base, so I used an inked embossing folder to run the base panels through my Cuttlebug.  I used some lightly glittered green cardstock for the tree which adds a pretty sparkle, and popped on some red bird bulbs in place of clear to add to the woodland character I was going for. 


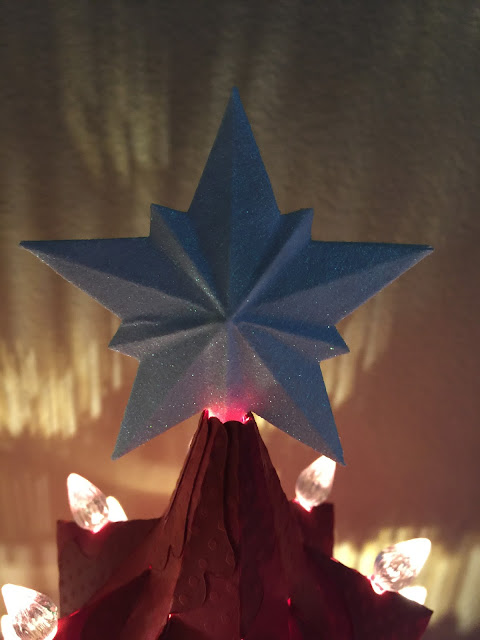
I really wanted my star to have a little glow to it, but was planning on using the candle lamp as my light source, so had to get creative with how I'd throw some light out the top. I added vellum to the backside of both of the star pieces and inserted a tiny little piece, probably only about 1/4" long from a drinking straw in the hopes that some light would carry upwards.  It worked! It's not terribly bright, but it does give the star a nice glow I think.


Next up, a red tree for a family member who just adores the color red.  I think she's going to love it!


I made a a white glitter star using Tim Holt's Dimensional Stars thinlit die. I cut out two of them and glued them back to back to get one very dimensional star.


After making the trees, I kept thinking about adding some toys under them to mimic the tree my grandmother made so many years ago. Then an idea hit.  

I couldn't have a tree without a train!


Yes, it's a real working train and a relatively inexpensive one at that!  I found this Westminster Train in a Tin on Amazon and had to give it a try. It's remarkably powerful for a little battery-operated train. I was holding off on this blog post until my train arrived and once it did, I realized that the track wouldn't go over the cord from the candle lamp! So I built a little tunnel that I could lay the cord over top of and the train goes right underneath. It was a quick little project that I didn't even use my cutting machine to do. I'll definitely be dressing it up at some point, but it's good enough for now. I was in a hurry to test out my train!


I have one or two more trees to make, but now that I've done a few, they should go together pretty quickly.  

Thanks for stopping by!

Friday, June 23, 2017

Bikini Brew - Coffee Lover's Summer Blog Hop


Just a quick post today with my entry for a summer-themed coffee, tea or cocoa project for the Summer Coffee Lovers Bloghop hosted by coffeelovingcardmakers.com.

The coffee cup is an svg file from the Good Day at the Office kit by SVGCuts.  I put my own twist on the coffee sleeve with the 'bikini brew' label and embellished with some sequins from 28 Lilac Lane and Simon Says Stamp.  The pink bikini is cut using a die which is from the Simon Says Stamp July 2017 card kit. 

This was quick project to put together. It took my longer to choose and add my embellishments than it did to build the cup.

Thanks for stopping by to check it out. I'd love to hear what you think!

Tuesday, January 31, 2017

Magnolia Manor - Key West style


Since I live in a warm, sunny climate, I'm always looking to make projects that reflect local areas. In Florida, many homes are painted in colors you might not find elsewhere around the country. Whether bright or pastel, there's no shortage of pink, minty green, yellow and blue in the local neighborhoods. 

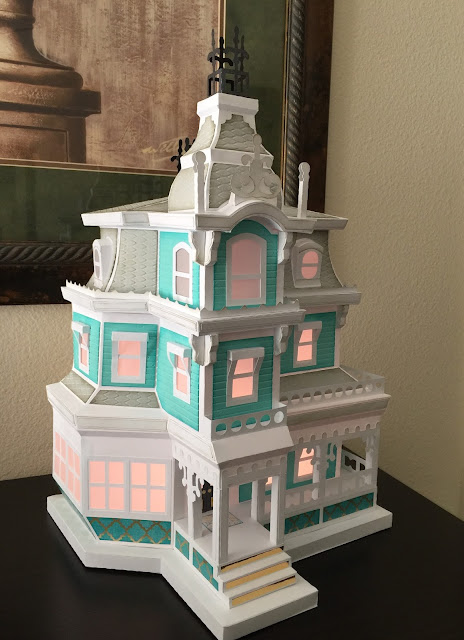
I've never had the chance to visit Key West, but have seen some photos of brightly colored Victorian homes, so I'm going to imagine that my Magnolia Manor is sitting right in the heart of Key West. Magnolia Manor is the most recent offering from SVGCuts.

This was definitely one of the most challenging projects I've attempted to date, and it didn't necessarily come out as perfectly as I would have liked. That said, it's just paper and it was fun to play with, so I'm taking the advice of Tim Holtz who encourages us all to embrace imperfection!  And if you only look at it from certain angles, you don't even see my goof ups. 
😀


If you've ever read the poem "There was a Crooked Man" I'll just say that this might be where he lives! I really am good with it though. We get a lot of hurricanes here...

I used a mesh embossing folder from Tim Holtz (shown below) to create the roof panels, but I flipped it over backwards to get the scalloped roof tile look rather than embossed mesh.  


I used some shiny gold paper to add brass kick plates to the front door along with some tiny brass doorknobs. 

All in all, I had a lot of fun inking and planning out the colors and details for this project and am already pondering what I'll add to it before next Christmas rolls around. Maybe some palm trees with ornaments!

As always, thanks so much for stopping by to check out my Key West Magnolia Manor!  I always love to hear what you think. 

Thursday, August 11, 2016

Football Marquee Sign


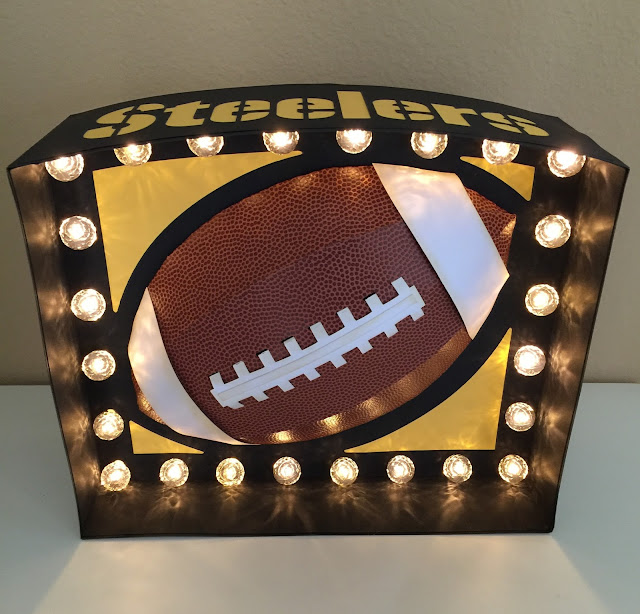
I had so much fun building this football marquee sign from the SVG Cuts Game Day Marquee Signs kit

I used some pigskin paper that I found at Hobby Lobby for the football, and therefore did not use the extra football panels for embossing since this paper is already textured.  


Since this is for personal use only, I added a "Steelers" cutout to the top panel. One thing that I found out after the fact is that NFL footballs don't have the white stripes on the ends. Unfortunately they were already glued down when I was informed of this, so my project might look a little mismatched to die-hard football fans, but I'm good with it and so is the recipient. And now I know for next time! Am I the only one who didn't know this?

I had some of the smoke-colored, faceted Heidi Swapp bulb caps in my stash, so I used those as they blend in really nicely with the black background paper when the lights are off. 


And when the lights are on, they're a little bit of a softer light and I love the effect from the facets.


I have a feeling I'll be making several more of these for Christmas for the sports fans in the family!  I got this one done just in time for tomorrow night's first pre-season game for the Steelers. I hope it brings them luck.            

Thanks for stopping by!

Sunday, July 3, 2016

Oh say can you SEA...


I just fell in love with the Waving Flag Bag in the new Happy 4th SVG kit from SVG Cuts!  I considered making it in the traditional red, white and blue colors, but for me the 4th of July was often celebrated on the New England seaside and I've always had a love of the beach and could just picture this flag with a bit of an ocean theme.  

When flipping through my paper stash, I came across an older K&Company stack by Tim Coffey called Travel which is loaded with wonderful designs, so I picked a few to represent the red, white and blue and went from there. I inked the panels using Distress inks in Antique Linen, Iced Spruce and Fired Brick.  


I also dug into my Tim Holtz die inventory to create the starfish 'stars' for my beachy flag. These are from the Sand & Sea dies, Bigz and Movers & Shapers.  I tried to keep the color light so it would show up against the relatively light blue background. I rubbed the stars with a little Distress Stickles in Scattered Straw.  It looks a lot like sand in person.

As usual I spent more time on paper selection than actually building the project. This is a super easy project to do and makes such a nice seasonal decor piece.  

Happy 4th of July!  


Thursday, June 16, 2016

Route 66 Box Card


With Father's Day coming up, I was excited to make a few of the newest designs from SVGCuts. This one is the Route 66 box card from the Travel the World kit.

I altered mine slightly to include a fun piece of Tim Holtz ephemera which is a fuel calculator of sorts. It seemed to go well with the classic styling of the car.


I also made the car yellow to match a classic car owned by the recipient:


Lightly glittered black paper made for some realistic looking 'asphalt' flaps!


Last but not least, I had some fun street sign paper in my stash to make the envelope as shown in the background below.  I love how this whole project turned out and I can't wait to give it to the recipient!


Thanks for stopping by!