Tuesday, June 28, 2016

Rocket Lantern

...and the rocket's red glare....
  

Okay, well maybe more than just red glare! I only made one rocket (so far), but I was having a good time taking pictures of it every time the tealight changed color, so figured I'd just share all of the colorful pics. 

Here's a closer look at my Rocket Lantern from Dreaming Tree's Stars and Stripes Forever bundle. It's just one of three illuminating projects just in time for the 4th of July. 


I didn't really do anything to change this one very much from the original by Dreaming Tree...why mess with perfection?  I did use silver glitter paper for the nose cone and base, but other than that, I kept it pretty simple.  

This could be so cute for New Year's Eve too, don't you think?  Maybe done in black, silver and gold instead?  The sky's the limit (pun intended).  

Thanks for stopping by! 

Thursday, June 23, 2016

Sunflower-ish Tealight


Just a really quick post to show you what I did with the free Gerbera Daisy Tea Light from Dreaming Tree.  

For some reason I was thinking of how cool these would look in some fall colors, and decided to make this into a sunflower of sorts.  Or maybe a black-eyed susan?  Either way, the sequins in the center reflect the tealight flame a bit and make this extra sparkly which always makes me happy. I think a glittered center would be cool too.  

Thanks for stopping by!

Tuesday, June 21, 2016

Fire & Dragonfly Lantern

It's a bit of an overcast day today, so I thought I'd light up my lanterns for their moment in the front of the camera!


Both of these are from the new Summer Nights and Flights bundle by Dreaming Tree. I actually had the same Violet Leaf stack of DCWV paper and so I made my first lantern (the one on the right) to look almost exactly like the one that Dreaming Tree shows on their website. 

I made a second lantern for a neighbor who just returned from a few months in China and who brought me back the gift of a beautiful silk scarf. To me this lantern has somewhat of a pagoda feel, so I made one in green and gold to use as a thank you for the scarf.  I used paper from the same stack, although this time it's metallic gold flowers on a green background.  


I embossed the gold panels with a Cuttlebug Oriental Weave embossing folder which seemed to make them super shiny with all the extra facets to reflect light.


I also added a gold glitter ball on top as shown in the assembly video, but rather than paint mine with glitter paint, I covered it in quick dry glue and sprinkled Martha Stewart ultrafine glitter on it and then let it dry for a few hours before gluing it on top with some Glossy Accents.

BONUS!  Dreaming Tree just added some FREE Autumn Nights and Frights panels for this lantern so it can be used for Halloween too!  Now I can't wait to make the spooky version!

I hope my neighbor enjoys the lantern. Thanks for stopping by to check them out!  


This post may contain affiliate links. If you purchase a product using the link I may receive a commission.  I only participate in affiliate programs for products or services that I personally use and recommend.  

Thursday, June 16, 2016

Route 66 Box Card


With Father's Day coming up, I was excited to make a few of the newest designs from SVGCuts. This one is the Route 66 box card from the Travel the World kit.

I altered mine slightly to include a fun piece of Tim Holtz ephemera which is a fuel calculator of sorts. It seemed to go well with the classic styling of the car.


I also made the car yellow to match a classic car owned by the recipient:


Lightly glittered black paper made for some realistic looking 'asphalt' flaps!


Last but not least, I had some fun street sign paper in my stash to make the envelope as shown in the background below.  I love how this whole project turned out and I can't wait to give it to the recipient!


Thanks for stopping by!

Tuesday, June 14, 2016

Dreaming Tree Blog Hop Winner! Is it you?


Congratulations to  
Laney H. 

who was the winner of the $10 Dreaming Tree gift certificate from this stop on the blog hop!

Laney, I've emailed you information about how to claim your gift certificate. 

And just because the giveaway has ended doesn't mean that you can't still check out all of the fabulous projects from the hop. Maybe you left a winning comment on another hop stop!

Don't forget to visit DreamingTree to see the latest designs and free downloads too. There are so many great projects just waiting to be made!

Here were the other stops on the hop in case you missed them:

3.  Just Yolie            
5.  Izbzee

Friday, June 10, 2016

Star Spangled Basket - Dreaming Tree Blog Hop

Welcome to the blog hop featuring Dreaming Tree SVG files!  Leave a comment below for your chance to win a $10 Dreaming Tree gift certificate.


I always try to switch out my home decor a bit to match the seasons and holidays. In recent years, I've created a lot of my own pieces using my Cricut and SVG files I've purchased.  This time of year, I break out the red, white and blue for the summer holidays, Memorial Day through Labor Day.

I was inspired to create this Star Spangled Summer arrangement using the Blossom Basket from the Daffodilly Spring bundle as the base.

I used the optional plain exterior panels (in the extras folder) and embossed them with a basket weave pattern. I just discovered these amazing embossing folders from We R Memory Keepers. They are called Next Level Embossing Folders and they have such great detailed impressions.  I'll be shopping for more of these soon. I was experimenting with them on some scraps while trying to decide which one to use:


I added some star and flourish cutouts to the blue base trim that I found in the O Christmas Tree bundle on the Star Gift Box lid and front panel.


Some clear crystal gems and pearl bling around the blue basket trim added a nice contrast with a bit of sparkle and shine. I just love bling!


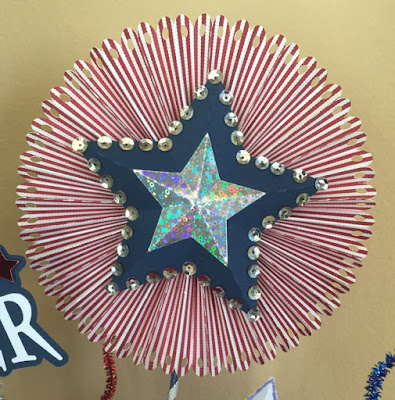
Using the rosette from the bottom of the Umbrella Egg in the Daffodilly Spring bundle along with the dimensional star from the Star Gift Box, I added some ribbon to a bamboo skewer (as shown in the assembly video tutorial for the Hearts Bouquet, Hugs N Kisses bundle) and created a spangled star of my own!  A few silver sequins around the edges of the star really make this shine.


I made a few more of the dimensional stars from the Star Gift Box in different sizes to add to the arrangement and created the Star Spangled Summer sentiment using my Make-the Cut software.


With some glittery pipe cleaners I created a little firework explosion on a stick in red, blue and silver. I used some of the same pipe cleaners and coiled them around a pencil to make some sparkly squiggles (technical term!) to add to the basket.


I enjoy seeing this new addition to my summer decor every time I walk past it!


Thank you for participating in the June Blog Hop Featuring Dreaming Tree SVG Files. To enter for your chance to receive a Dreaming Tree Gift Certificate you must leave a comment.  The more blogs you visit and comment on, the more chances you have to win! Contest runs from 06/10/2016 12:00 AM EST to 06/13/2016 11:59 PM EST. 1 winner will be awarded from each blog and 1 grand prize winner will be awarded based on all comments from all blogs. Winners will be posted by June 15, 2016. Please check back to see if you are a winner!

a Rafflecopter giveaway

Please continue the hop by visiting the next crafter on the list!


you are here!       4.  A Thing for Paper                             
5.  Izbzee


Last but not certainly not least, don't forget to stop by the Dreaming Tree website to check out their fabulous free files and sign up for their newsletter which will keep you in the know!


This post may contain affiliate links. If you purchase a product using the link I may receive a commission.  I only participate in affiliate programs for products or services that I personally use and recommend.