As usual, I've cut it right down to the wire getting my tag done for this month, but I did spend a lot of time thinking about it. The ideas all fell into place a few days ago. As Christmas has now passed, I used the upcoming new year as my inspiration.
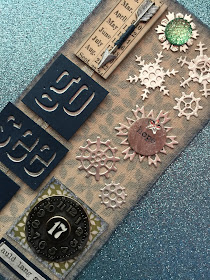
I wanted to use brushed pewter stain, but wasn't sure how that would show up on the burlap, so I opted for a piece of the textile surfaces linen instead and used the Nordic stencil. I really like the subtle shimmer of the pewter stain on the linen. I distress the edges a bit and inked with stormy sky and chipped sapphire ink around the edges.
I continued to use silver throughout the tag, including silver embossing powder on the 'go see do' shadowpress, used some silver metallic ribbon trimmings behind the shadowpress panels and obviously the snowflakes and gears are all cut out in silver as well. I actually added some metallic mixative alcohol ink to the arrow to make it more silvery.
The arrow on the calender tile piece is symbolic of the start of a new year, as well as the ball dropping in Time's Square on New Years Eve. I used alcohol ink to tint a gumdrop a lovely aqua color (a favorite color of mine) and added it to a few layered mini snowflakes to represent the infamous ball. I added some mercury glass Stickles to add a little bling reminiscent of the sparkling ball as well.
The snowflakes (mini paper snowflakes thinlit) and gears (gearhead thinlit) represent the transition from the holiday season into the new year and time to get back to work and busy with new endeavors.
The snowflake with the hope token and mirrored star is a tribute to Carrie Fisher. I've been a huge fan of Star Wars since I was a child and have lived long enough to have seen every single film in the theater. It was a sad and sentimental day when I saw Rogue One the day after her passing. Anyone who has seen the film will understand why I chose the message of hope to represent her.
The clock and 17 number brad represent the passage of time into the new year, 2017. The 17 was filled in using picket fence distress crayon. I mounted it on a square of green Nordic print from the Tidings paper collection and edged it with some stormy sky and chipped sapphire ink before deciding to add some rock candy glitter too. Love the icy sparkle this adds.
Last, I used some brushed pewter stain over the 'auld lang syne' chit chat sticker and attached it with the mini attacher to a remnant piece of navy cardstock.
Thanks so much for stopping by to check out my tag and last blog post of the year. I can't wait to see what 2017 brings! Go. See. Do.
Wishing you all a very happy new year!


